I get a lot of emails regarding my blog and many people offer to write guest posts, give me infographics to publish or blatantly ask for google juice for their services. This can get annoying, especially when it is obvious spam or link farmning or the people sending me mail don’t even bother reading my blog beforehand.
From time to time, you do get some gems though, like the other day when Jack Collins contacted me with this email:
Hi Christian, My name is Jack, and I’m hoping to get in touch with you about a video I helped create that explores the psychology of internet trolls. I saw this post “De-trolling the web – don’t post in anger“, and thought you and your readers might find some value in it. The video highlights the phenomenon of the online disinhibition effect. Let me know if it’s something you’d be interested in seeing or sharing, and I can forward it along. Thanks for your time, Jack Collins
I was intrigued, answered Jack and got a second mail with the link to this video. I love it – it is a great example how to present research information in a short, informative and creative way. Whilst I am utterly tired of rage comics and consider them a massive waste of bandwidth and perceived creativity it makes sense to use them here to show what the research was about. I learned a few things, for example I did not know trolling came from fishing and that there were even trolls on ham radio in the past. The best, however is the advice at the end.
Trolling is not a game of solitaire. Unless we want to actively suppress freedom of speech, the only way to beat a troll is to not play the game.
In other words – don’t feed the troll.
A strange game. The only winning move is not to play. How about a nice game of chess?
Creating rollovers is easy. Much easier than it was in the past with the infamous MM_mouseover at least. It gets tricky though when you want to have the rollover only happen on a certain shape and not only in a rectangular area.
There are many solutions to this, like SVG masking or adding lots of rectangular overlays that make up the desired shape, but I wanted to have a simple solution. You can see the solution working here in this GIF:
What I am doing here is adding PNGs (courtesy Game Icons) with transparency to the HTML and give them a class of rollover:
This seems to be a very simple way to have irregular shaped rollovers. You could enhance the hover() function to also react differently depending of which part of the shape you are on. You can also add touch handlers easily. The only caveat is that the images and the JavaScript need to be on the same domain or the canvas is not allowed to access the pixels of the image.
Posted in General | Comments Off on Irregular shape rollovers with Canvas and PNG
They decided they actually really hate you and everything you stand for
They’ve been abducted by aliens and are busy being probed
They watched too much Fox News and now receded to the cold war bunker eating tinned apricots until it is safe to come out again
They never existed, you are actually in a secret government facility strapped to a chair and they keep injecting you with neurochemicals telling you that you are a web designer
They are but they are wearing false noses, teeth and hairpieces to disguise themselves and really mess with you
* Hey, I never claimed they are good reasons. I just wanted to do one of those incredibly successful blog posts with a catchy title that get tweeted around a lot.
Posted in General | Comments Off on Five reasons your visitors don’t return to your web product *
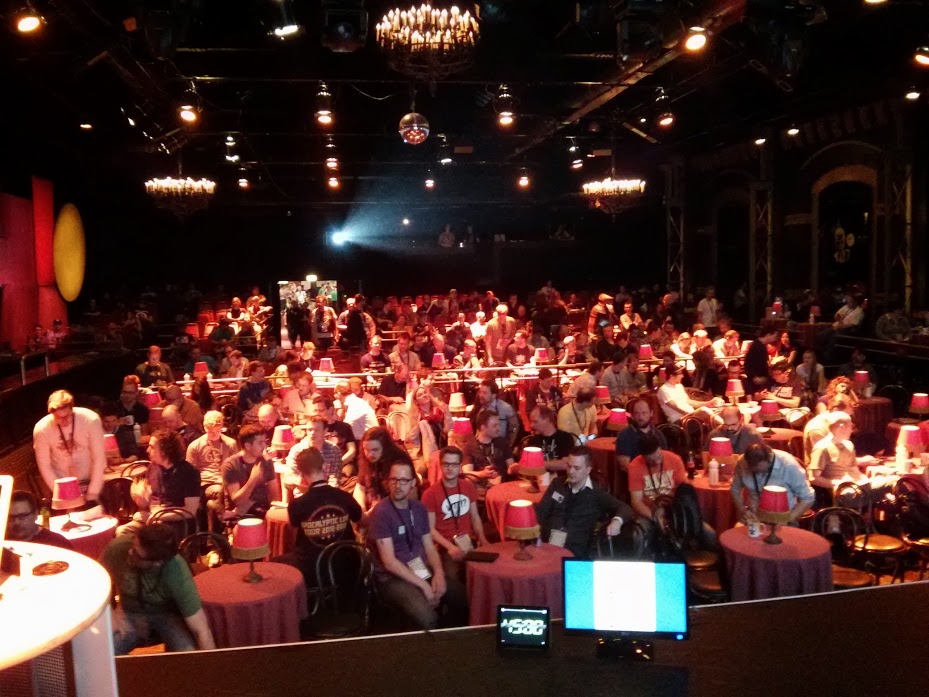
The last few days I spent in sunny Duesseldorf attending the Beyond Tellerand conference, organised by my good friend and partner in 8-bit crimes, Marc Thiele.
I’ve been saying for quite a while that the success and quality of a conference is incredibly linked to the enthusiasm of the organisers and with Beyond Tellerand, you hit the jack-pot, both as a speaker and attendee. I could wax poetic about how great the conference, how diverse the talks and how funky the location were but my colleague Marco Zehe did a much better job in his conference write-up. Suffice to say, I really enjoyed it and consider Beyond Tellerand one of the best conferences in Europe at the moment. I especially like the intelligent decision not to bother with catering but bring people into an area with lots of restaurants and give them a longer break instead. All in all, the schedule had lots of great breaks to network and there was no sense of rush at all.
I was scared and also very honoured to give the opening keynote on the second day, with my task being to wake the crowd up after the party the night before and to set the tone for the rest of the day.
In my keynote Fixing the Mobile Web, I explained that I am worried that we lack passion for quality in our craft and instead follow a breakneck speed race of releasing more and more and quicker instead. I also pointed out how we got a lot of promises of what HTML5 would mean for us and got let down by the platforms that waved the flag the most and called Flash dead. I then explained how FirefoxOS wants to bridge that gap and fulfill these promises whilst being the first impression millions of new users will get of the web with our work being the first things they use.
I recorded a screencast of the talk with some audio issues, but it still should give you a good idea of what was going on until the organisers release the high-quality video.
Furthermore there will be a German recording I did with the Workingdraft podcast once they edited it which goes into more detail about FirefoxOS and my presentation.
All in all I want to thank everybody involved. The people who came to see and talk to us, all the other speakers who did a great job, the organisers and sponsors and the crew of the location. It was fun and it will come back soon, so check out Beyond Tellerand.
Posted in General | Comments Off on Fixing the mobile web at Beyond Tellerand
With my chapter for the upcoming Smashing Book 4 done and talking about “The Vanilla Web Diet” and some workshops in the making I thought it is a good idea to show in an example how to make a seemingly good solution better by rethinking it with the principles of the vanilla web diet in mind.
The solution I am targeting is the image swivel effect that was posted a few days ago on CSS tricks. I sent my solution to the author and he was very interested in getting more information as to the why. The effect as it stands works and does the job to inspire people to play with it. The comments showed that where lots of developers had a go at creating their own solutions fixing some of the issues I am about to cover here. My favourite probably is Eduardo García Sanz’s Pure CSS solution which to me is a good plan to achieve an effect like that if you don’t need touch support or keyboard access.
Before I get accused of “hating” – the code is OK as a demo to get creative juices flowing but it has many issues that would show up when used in production. It is also mouse-dependent and doesn’t work on touch devices. Therefore I’ll start by stating what I find troublesome about the published solution and then explain how to approach the problem to make it as simple and maintainable as possible. I also add support for mouse, keyboard and touch access and try to achieve the effect whilst not blocking people out.
If you prefer to see this as a screencast, here is one I recorded explaining the ideas, the issues I found with the original code and how my solution works. This is live and unscripted.
How much markup do we need?
Let’s start by looking at the solution that is shown in the CSS tricks article.
The HTML is the following:
<divid="faces"><divid="face-area"><divid="image-1"style="display: none;"><imgsrc="/images/look-left-3.jpg"></div><divid="image-2"style="display: none;"><imgsrc="/images/look-left-2.jpg"></div><divid="image-3"style="display: none;"><imgsrc="/images/look-left-1.jpg"></div><divid="image-4"style="display: none;"><imgsrc="/images/look-center.jpg"></div><divid="image-5"style="display: none;"><imgsrc="/images/look-right-1.jpg"></div><divid="image-6"style="display: none;"><imgsrc="/images/look-right-2.jpg"></div><divid="image-7"style="display: none;"><imgsrc="/images/look-right-3.jpg"></div><divid="the_faces_overlay"><divclass="the_faces"data-number="1"></div><divclass="the_faces"data-number="2"></div><divclass="the_faces"data-number="3"></div><divclass="the_faces"data-number="4"></div><divclass="the_faces"data-number="5"></div><divclass="the_faces"data-number="6"></div><divclass="the_faces"data-number="7"></div></div></div><!-- END #face-area --></div><!-- END #faces -->
Warning sign #1: Repeated HTML structures without logical connections
This is a very common mistake I see when starting an effect like that. We create something that contains the content and then something that gets acted upon to show the effect. Thus we lose the benefit of already interacting with the parent element and using event handling to find out where we are. I guess historically this is based on “CSS only solutions” that needed that kind of separation as you could not calculate or detect mouse position in CSS.
As we create two separate sets of markup for an effect we need to find a way to connect the element that was interacted with to the one we want to show. This means adding IDs to all the elements, classes to all the elements we interact with and a data attribute to tell which of the images to show. This is bad for maintainability. If we add an image, we need to also add an element to interact with. Great code is catered to making maintenance as easy as possible. Here we have a lot of dependencies to deal with when adding or removing an image.
The other gripe I have with this HTML is that it means nothing at all. As the order of the images is important, the right HTML construct to use here is an ordered list.
Another big HTML mistake is adding images without an alt attribute. This means that screenreader users would get the file path of the images read out to them. Either provide a sensible alternative text or add a alt=”” to hide the image from screenreaders.
Warning sign #4: Dependency on the number of elements
One big warning sign to me here is that our effect is dependent on the number of images in the widget and that we need to have the data attributes and the IDs maintained together although they are on different elements.
The more elements we add means the more IDs we need to maintain. This is not what coding is about. Computers are good at calculating things for us.
Whenever I see inline styles I know something went wrong. There is no point in them and if ever they should only be generated by code, not by humans. The same with empty HTML elements: you probably did some extra work that is not needed. HTML is there to contain content or provide interaction. If you have a lot of empty DIVs without an obvious templating use case, something went wrong.
Giving no power to CSS
The CSS of the solution is not much, and it doesn’t do much either. This is a shame seeing how much easier it is for a visual maintainer to change CSS rather than changing JavaScript.
body {background:#333}#faces{height:333px;width:500px;margin:0auto;border:8pxsolidwhite;}#face-area{height:500px;width:333px;position:relative;}#the_faces_overlay{position:absolute;width:500px;top:0;left:0;}#faces.the_faces{height:333px;width:14.2857143%;float:left;margin:0;padding:0;}
Warning sign #6: CSS dependent on the amount of elements
The glaring issue here is the “width: 14.2857143%;” which is calculated by dividing 100% into seven parts. This means that if you delete an image from the HTML, you also need to change the CSS width here. You should never be dependent on the amount of elements in your CSS, as those are prone to change. In this case especially there is no logical way to find out why this is the width. CSS calc() can at least make that obvious but in general it is a bad idea to create look and feel that is tied to a certain amount of elements.
Goldfish jQuery
The jQuery code to make the effect work is very short:
// Reveal the "center" imagevar centerImage = $("#image-4").show();// Bind hovers to each column
$(".the_faces").each(function(){
$(this).on("mouseover",function(){
$("#image-"+ $(this).attr("data-number")).show();}).on("mouseout",function(){
$("#image-"+ $(this).attr("data-number")).hide();});});// Reset center image
$("#face-area").on("mouseleave",function(){
centerImage.show();}).on("mouseenter",function(){
centerImage.hide();});
// Reveal the "center" image
var centerImage = $("#image-4").show();
// Bind hovers to each column
$(".the_faces").each(function() {
  $(this).on("mouseover", function() {
    $("#image-" + $(this).attr("data-number")).show();
  }).on("mouseout",function() {
    $("#image-" + $(this).attr("data-number")).hide();
  });
});
// Reset center image
$("#face-area").on("mouseleave", function() {
  centerImage.show();
}).on("mouseenter", function() {
  centerImage.hide();
});
It is, however, very demanding to the browser. Slowing down a browser can be done in many ways – the most damaging ones are heavy computation, accessing the DOM and lots and lots of event handling. The latter two is what we do here.
We loop over all the elements with the class “.the_faces” and add a mouseover and mouseout handler to each of them. Every time these get fired, we read an attribute, create a string with it and access an element that has the ID of the string and show or hide it. Showing and hiding using the jQuery methods is another access to the DOM as it manipulates the display style property. We show and hide the “center image” upfront and also on another event hander on the overall parent element.
If we were to add touch and keyboard handlers we’d triple the amount of assigned event handlers as we apply them on each image.
I call this Goldfish code – we keep asking the browser for things we should already know. The widget interface we have here is static HTML - there is no loading of content, no changes in it. Therefore there is no point in continuously reading out what the data-number attribute is and ask the browser to find the element with a certain ID. Caching results is a very simple thing to do and the performance benefits are amazing.
Rethinking the solution the vanilla web diet way
I approached the solution by looking at what we need to do here:
We have a widget of a certain size with images in it
We have an unknown amount of images – it should be dead easy to remove or add one or replace them all
Moving the mouse over the widget should loop through the images, also touching the widget should do so and it would be nice to be able to flip forward and backward with the keyboard
Should things not work out it would be nice to have an display that still makes sense
We should link this to something – after all a beautiful effect like that should react in some sale or deep-dive, right? Good thing is that in HTML5 links can contain other elements. So all we add is a link. This automatically gives us keyboard access to the widget – something otherwise we’d have to create by using roaming tabIndex.
As the order of the images is important, an OL is the right element to use. Each image has an empty alt attribute to ensure there is no hassle with screenreaders. Instead of defining which image to show as the first one in our JavaScript we keep this maintained in HTML, too, by adding a class of “current” to the image.
Showing and hiding with CSS
body {font-family: arial,sans-serif;}#rollover.js{display:block;margin:2em;z-index:3;position:relative;height:270px;width:200px;cursor:none;}#rollover.js img {width:100%;position:absolute;top:0;left:0;visibility:hidden;}#rollover.js img.current{visibility:visible;}
As our functionality is dependent on JavaScript, our styling should be, too. This we can achieve by adding a “js” class to the element when JavaScript is available and only apply the styles when needed. This CSS gives the widget a fixed size and positions all the images stacked inside it.
Instead of doing a hide() and show() in JavaScript, all we need to do is to apply a class of “current” to the element we need to show. All the hiding and showing is thus done in CSS which means that in the future we’d want to do other visual things with the “shown” and “hidden” images, all we need to change is the CSS.
(function(){if(document.querySelector){var rollover = document.querySelector('#rollover');
rollover.className='js';var images = rollover.querySelectorAll('img');var all = images.length;var width = rollover.offsetWidth;var ox = rollover.offsetLeft;var boundarywidth = width / all;var current =0;var x =0;var index =0;var touched =false;var setcurrent =function(index){if(images[index]){
images[current].className='';
images[index].className='current';
current = index;}};var findindex =function(x){
index = parseInt((x - ox)/ boundarywidth,10);if(index !== current){
setcurrent(index);}};
rollover.addEventListener('mousemove',function(ev){if(!touched){
findindex(ev.clientX);}},false);
rollover.addEventListener('touchstart',function(ev){
touched =true;},false);
rollover.addEventListener('touchend',function(ev){
touched =false;},false);
rollover.addEventListener('touchmove',function(ev){if(touched){
findindex(ev.changedTouches[0].clientX);
ev.preventDefault();}},false);
rollover.addEventListener('keydown',function(ev){var key = ev.char|| ev.key|| ev.which;if(key ===37){ index = index -1;}if(key ===39){ index = index +1;}if(index <0){index =0;}if(index > all -1){index = all -1;}
setcurrent(index);},false);if(rollover.querySelector('.current')){for(var i =0; i < all; i++){if(images[i].className==='current'){
current = i;break;}}}else{
setcurrent(current);}}})();
(function(){

  if (document.querySelector) {

    var rollover = document.querySelector('#rollover');
    rollover.className = 'js';

    var images = rollover.querySelectorAll('img');
    var all = images.length;
    var width = rollover.offsetWidth;
    var ox = rollover.offsetLeft;
    var boundarywidth = width / all;
    var current = 0;
    var x = 0;
    var index = 0;
    var touched = false;

    var setcurrent = function(index) {
      if (images[index]) {
        images[current].className = '';
        images[index].className = 'current';
        current = index;
      }
    };

    var findindex = function(x) {
      index = parseInt((x - ox) / boundarywidth, 10);
      if (index !== current) {
        setcurrent(index);
      }
    };

    rollover.addEventListener('mousemove', function(ev) {
      if (!touched) {
        findindex(ev.clientX);
      }
    }, false);

    rollover.addEventListener('touchstart', function(ev) {
      touched = true;
    }, false);

    rollover.addEventListener('touchend', function(ev) {
      touched = false;
    }, false);

    rollover.addEventListener('touchmove', function(ev) {
      if (touched) {
        findindex(ev.changedTouches[0].clientX);
        ev.preventDefault();
      }
    }, false);

    rollover.addEventListener('keydown', function(ev) {
      var key = ev.char || ev.key || ev.which;
      if (key === 37) { index = index - 1;}
      if (key === 39) { index = index + 1;}
      if (index < 0) {index = 0;}
      if (index > all - 1) {index = all - 1;}
      setcurrent(index);
    }, false);

    if (rollover.querySelector('.current')) {
      for (var i = 0; i < all; i++) {
        if (images[i].className === 'current') {
          current = i;
          break;
        }
      }
    } else {
      setcurrent(current);
    }
  }
})();
Quite longer than the jQuery, but bear with me as this does a lot more and in a much less demanding fashion. We wrap our code in a closure to makes sure we don’t leave any nasty globals behind. That should always be the first step.
Then we test if the browser supports document.querySelector. This is the standard answer to jQuery’s $() and is supported by lots and lots of great browsers. It is not supported by old and outdated browsers, which is why it is a good idea to test for it. This means that old Internet Explorer versions will not get the effect but instead they get the images as a numbered list (as we made the CSS dependent on a class applied with JavaScript). This is good, as it means we don’t need to test on these old browsers, which is hard to do and frankly a waste of our time.
We get a reference to our rollover widget using document.querySelector() and add the “js” class to it. This hides all the images and sets up the look and feel of the widget – all maintained in CSS. No need to loop through a lot of elements or use inline styles to hide them.
Next we get references to all the DOM elements we need and calculate what we need to find out what to show when the mouse cursor or the finger is on a certain part of the widget.
First we get all the images and store them in images. This will not change while the page is open, and querySelectorAll() gives us references to all of them. We store the amount of images in all to compare against later on.
Next we do the thing dynamically that the original solution did by hand – calculate the width of the different strips of the interaction that shows and hides images. We do this by reading out the offsetWidth of the widget as it is defined in CSS, so we don’t know and don’t want to hard-wire any widths in our JavaScript. We find out how far left the widget is in the browser by reading the offsetLeft property and store that in ox. Then we calculate the width of the interaction boundaries by dividing the width of the widget by the amount of images and store that in boundarywidth.
This makes the widget flexible to change any time the CSS changes or the amount of images does. If you remove or add an image, the width of the boundaries is calculated newly. No need to change the CSS to reflect that width. We made this now maintainable simply by adding or removing list items.
We define the current shown image index as 0, preset an x variable as 0, define the current index of the detected movement as 0 and set touched to false.
The index will be the index of the image to be shown at a certain point in the interaction. The index of the currently shown one is be stored in current, x will be detected position of the mouse or finger on the screen and touched defines if the screen is currently being touched or not.
The setcurrent() function hides the last shown image and shows a new one by shifting the “current” class from one to the other. It then stores the new image index in current. This is a very simple way to show a new state in a collection of things that can only show one at a time. No need to ask the browser which one is visible when we can store this in a variable like current.
The findindex() function converts the detected horizontal position of the mouse cursor or the finger of the user into an index of our image array. All you need to do is to subtract the left position of the widget itself and divide the value by the boundarywidth. Convert it to an integer and compare it to the current index and if it differs, call setcurrent().
All that is left is to assign the event handlers to make the magic happen. The first is a mousemove listener on the widget that calls findindex() when no touch happened. The current horizontal mouse position is stored in clientX of the mousemove event.
Touch interaction needs to be initiated (at least in Chrome in my testing here) so we set the Boolean of touched to true when a touchstart happened and to false when touchend was detected.
When a user moves a finger over the widget the browser fires the touchmove event and the current horizontal position is stored in the clientX property of the changedTouches array. We only detect the first finger in this case.
Keyboard detection doesn’t give us a position on the screen, so all we do is manipulate the image index directly. We listen for a keydown event and check the code of the key that was pressed. If it is the left arrow we subtract one from the current index and in the case of the right arrow we add one to it. We ensure that the index stays in the allowed limits and call setcurrent().
The last thing to do is to show the current image. If there is one with the right class in the HTML we need to find out its index and we do that by looping over them until we find the right one. If there isn’t any we just apply the current class to the first image (as defined at the start of the script).
Many solutions to the same idea
I hope this gives you an idea of how to approach an effect like that when you want to put it in production. There are of course other ways of doing it, but I wanted to ensure a few things that get very often forgotten:
The whole effect is now generated from the HTML, so all you need to do to create a new swivel is add other images
The whole look and feel is defined in CSS and you can resize the widget without having to worry about the size of the different boundaries
It can be used with a keyboard, the mouse or on touch devices
The DOM interaction is kept to an absolute minimum which means the performance on low spec devices is much, much better
There is no jQuery dependency
Posted in General | Comments Off on Giving “image swivel” the vanilla web diet treatment