Christian Heilmann

Author Archive

Quick Tip: Save Twitter GIFs as MP4 without any add-on or service

Monday, April 12th, 2021

When you want to save a GIF from Twitter, the interface plays a cruel joke on you. If you context-click the GIF you get a menu that states “Copy GIF address”.

Copy GIF address context menu on Twitter

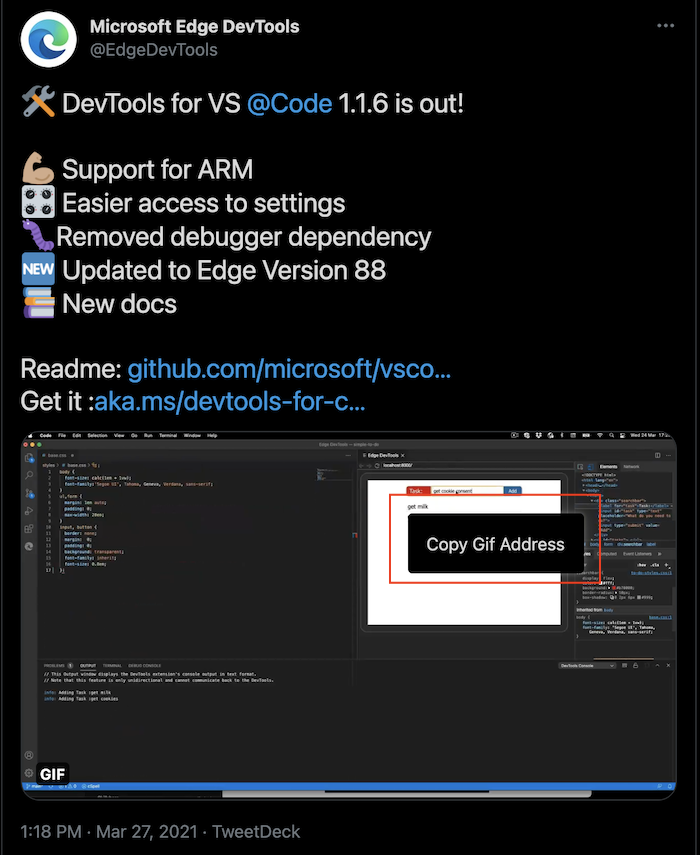
All it does though is copy a link to the tweet with the GIF in it, which is pretty pointless. Under the hood Twitter also converts any GIF to MP4 because it is a much more effective file format.

Knowing this, the easiest way to save the GIF is to open DevTools, go to the Console and type/copy:

window.open(document.querySelector('video').src)

This opens the GIF as a video in a new tab and you can save it there as shown in this screencast:

saving a GIF from Twitter

Of course there are a myriad of web services, Twitter bots and other things that do the same for you and also in more advanced fashion, but I think it is always a very good idea to not trust any service that offers to save protected content from the web for you. I’ve seen far too many malware browser extensions in that arena.

Quick Visual Studio Code tip: Expand/Shrink selection

Tuesday, March 23rd, 2021

The “expand/shrink” selection keyboard shortcut in Visual Studio Code βŒƒβ‡§βŒ˜→ / ← isn’t the easiest to remember, but ridiculously powerful. It recognises code block boundaries and selects accordingly!

Expand and shrink a selection in Visual Studio Code

Batch cropping of screenshots on MacOS

Wednesday, March 17th, 2021

I’m currently upgrading the Console documentation for Microsoft Edge and I needed to create a lot of screenshots for it. I wanted to make sure that they all are the same size, so I fixed a browser window to a certain size and instead of trying to screenshot a part of the screen, I thought it wiser to take full window screenshots. You do this by pressing CMD + Shift + 4, move your mouse on the window you want to take a screenshot of and press Space to save it to your Desktop.

MacOS by default ads a gorgeous drop shadow on any windows and puts some padding around it.

Screenshot of browser with chrome, dropshadow and padding around it

You can get rid of that on the command line or by selecting an even more complex keyboard combination.

However, I also wanted to get rid of the browser Chrome. The final result should be something like this.

cropped screenshot

So I tried to find a way to crop all the screenshots I have taken in a batch process using Automator. Turns out it can crop, but only from the centre. What I needed was a way to say “crop a rectangle of sx by sy from the image starting at x and y”. The solution was the Swiss army knife of images, ImageMagick. After installing it (via Homebrew), I was able to crop part of an image and create a new one on Terminal using the following syntax (with the bits in {} being the values):

convert sourceimage.png -crop {width}x{height}+{left}+{top} resultimage.png

I created a folder called “nochrome” on my Desktop and wrote this small shell script to batch convert all of them:

for filename in *.png; do\
  convert $filename -crop 1842x918+123+234 "nochrome/$filename"
  echo "$filename done"
done

There are probably easier ways, but that did the trick for me.

Conditional animations with CSS properties

Saturday, March 13th, 2021

Conditional animation with CSS properties demo code

Using animations, transitions and smooth scrolling is fun, but they also represent an accessibility problem. Various groups of people have a hard time using your products when things move and change all the time. This is why operating systems have a “reduced motion” setting you can turn on. Our CSS animations should respect these settings and only apply themselves when the user wants to see animations. The best way to achieve this is to wrap them in a prefers-reduced-motion media query. You can use that in various ways as described in this excellent article but they all come with the problem that you need to repeat the settings. There is a simpler way. You can use a custom property:

@media (prefers-reduced-motion: reduce) {
  :root {
    --nomotion: none;
  }
}
html {
  scroll-behavior: var(--nomotion, smooth);
}
button {
  animation: var(--nomotion, rotate 1s infinite alternate);
}

This defines the CSS custom property nomotion as “none” when the user doesn’t want to see any animations. If the user wants to see animations, it isn’t defined and thus the CSS engine applies the fallback, which is your animation settings.

You can see this in action in this CodePen:


See the Pen
Conditional animations with CSS properties
by Christian Heilmann (@codepo8)
on CodePen.


You can test it using the reduced motion emulation in the Browser Developer Tools. Here’s a screencast showing this in action:

Demo animation showing how to use Developer tools to simulate reduced motion

New article: “Beyond console.log() – level up your debugging skills”

Tuesday, March 9th, 2021

Today, Sitepoint released an article they commissioned me to write a few weeks ago that a lot of work went into and I’m happy with the result. In Beyond console.log – level up your debugging skills I describe a few features of Chromium browser developer tools and how they interact with Visual Studio Code.

syncing changes with workspaces

I cover the following topics/features:

  • Getting more information in your console.log() statements by wrapping values with curly braces
  • Formatting/converting log values with specifiers, for example console.log(‘%ix %s developer’, 10, ‘console’) resulting in “10x console developer”
  • Grouping logging statements
  • Using console.info(), console.warn() and console.error() to allow for filtering
  • Timing things with console.time() and counting with console.count()
  • Using live expressions to avoid slowing down your debugging with tons of log messages
  • Using Console utilities
    and built-in convenience methods like $() or monitor()
  • Using console.table() to display information, f.e. can you guess what console.table($$(‘img:not([src^=data])’), [‘src’,’alt’]) does?
  • Moving from Console to Sources
  • Using the Command Menu to access functionality faster
  • Storing your DOM manipulation scripts in Sources fo easier re-use
  • Enhancing third party websites with Overrides
  • Syncing changes you do in Developer tools live with your editor using Workspaces
  • Using the browser developer tools in Visual Studio code using the Edge Devtools for VS Code extension
  • Moving on to breakpoint debugging

VS Code Devtools extension

Go read the full article on Sitepoint