Christian Heilmann

You are currently browsing the Christian Heilmann blog archives for May, 2022.

Archive for May, 2022

A “Quick Edit” bookmarklet to make changes to any web site

Thursday, May 12th, 2022

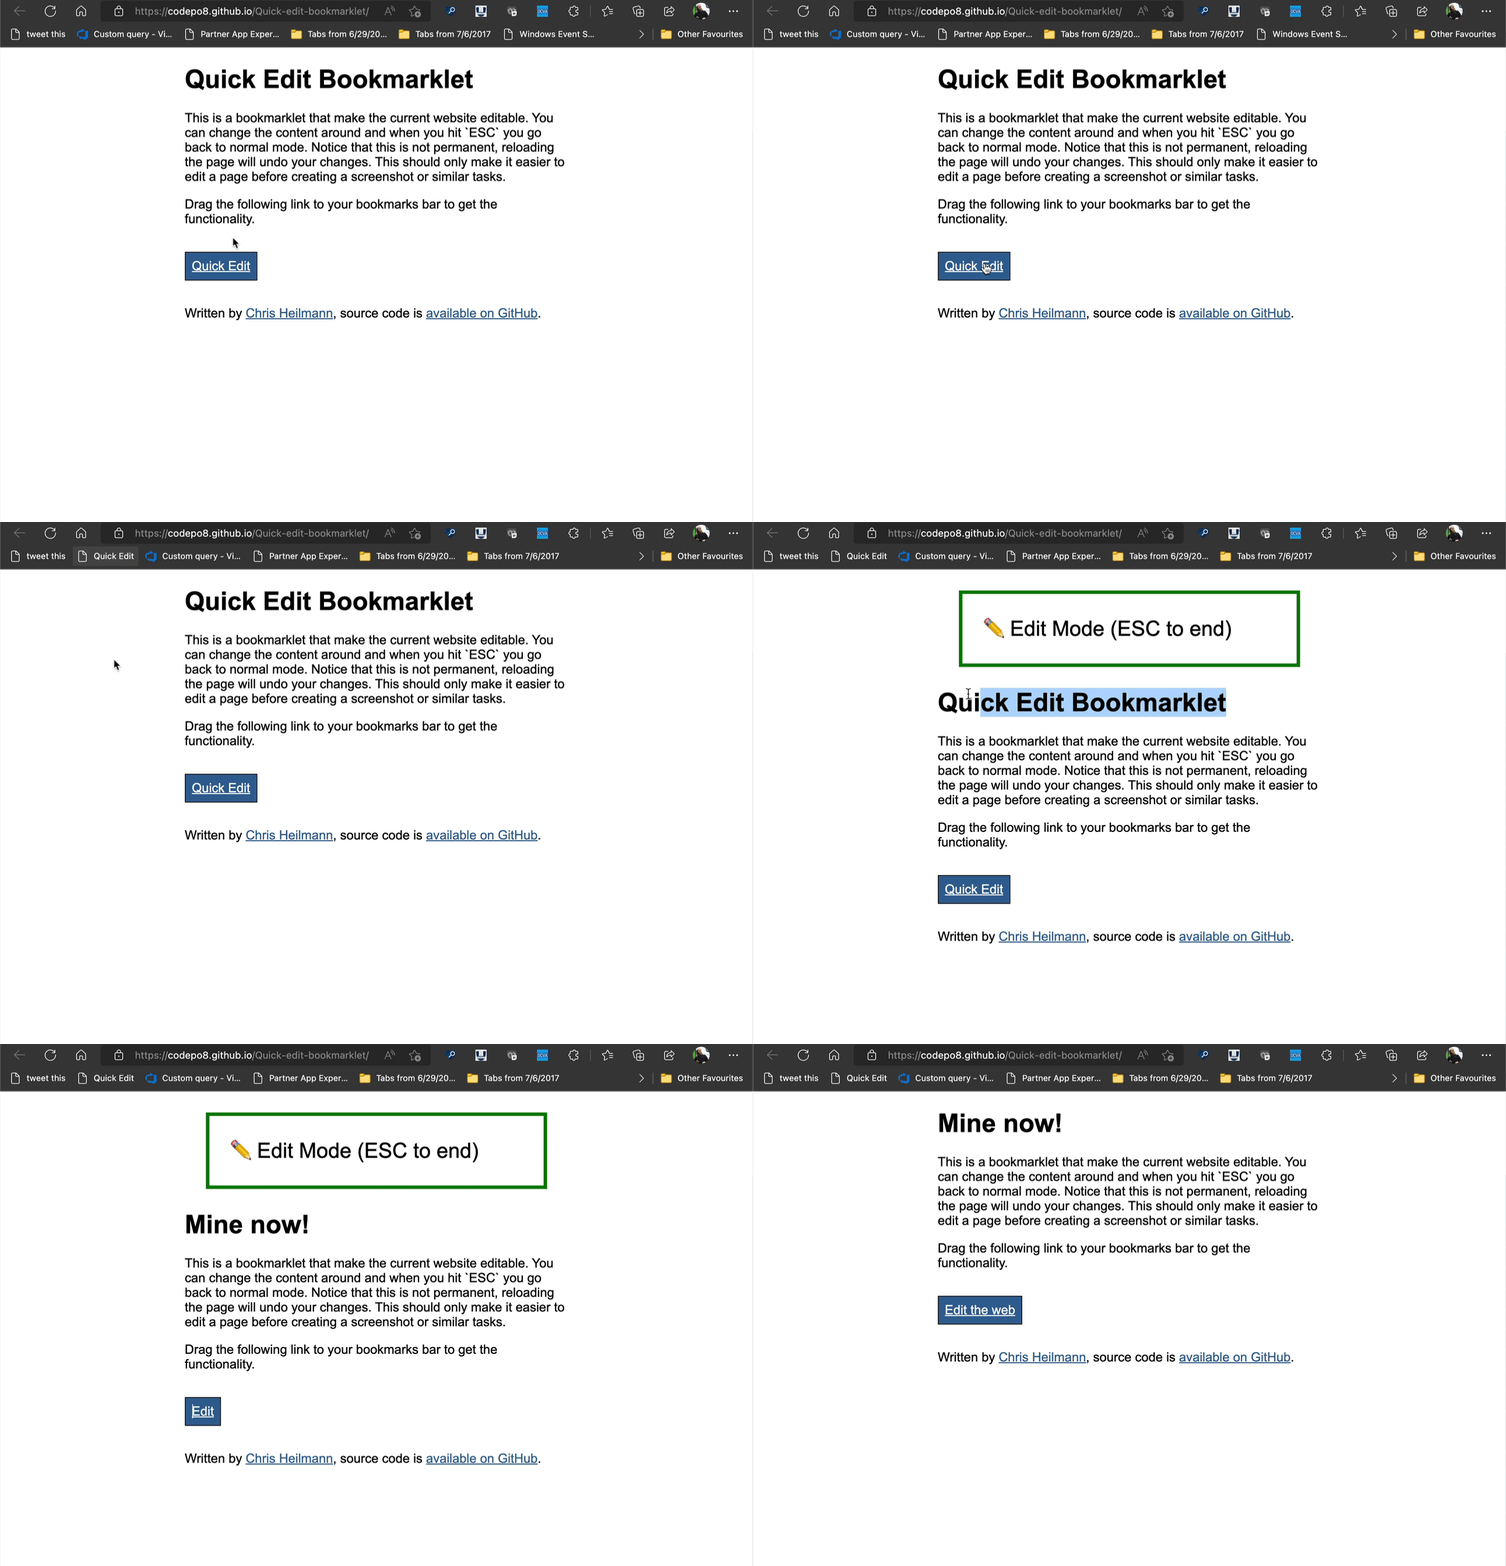
Using the Quick edit bookmarklet you can make any web site editable. Drag it to your favourites toolbar, click it and you get into edit mode. You can edit, copy and paste, delete and anything else. Hitting `ESC` will end edit mode.

Quick edit in action - drag it to your toolbar, click it and start editing the page. Hitting ESC end the editing mode

You can use this to quickly edit web sites before taking a screenshot, for example.

The source code is available on GitHub

Someone should build X for the web” – why not you? All you need is a GitHub account

Monday, May 9th, 2022

Last week, Šime Vidas complained on Twitter that it is hard to paste a block of text on a mobile device. I proposed to use pastebin.com but that needs a lot of taps before you paste. Šime then proceeded to joke that we should create pastebinzero.com and all it needs is a full-screen textarea with autofocus.

So I spent literally a minute to build this. In my browser, with nothing but a GitHub login. From setup, to coding with autocomplete support to hosting. You can see it in all its glory at https://codepo8.github.io/pastebinzero and look at the code at https://github.com/codepo8/pastebinzero.

And you can do that, too. Here is how.

If you feel like seeing this as a video, check out the following ~2 minutes walkthrough.

Otherwise, here are the steps to start, build and host any HTML/CSS/JavaScript based project on GitHub.

  • Go to your GitHub profile, click on `Repositories` and press the “New” button Animation of creating a new repository in GitHub
  • You need to name the repository, as this will later on also be part of the URL. GitHub automatically tells you if the repo name is still available or not. Make sure that your repo is public and hit “Create Repository”. If you don’t want to show the source code but only have people see the result, you can also keep it private. The generated GitHub pages are always public. Animation of naming and creating the new repository
  • This created the repository and you get all kind of information what to do next. For now, click `creating a new file` link. Animation of creating a new file in a GitHub repository
  • Name the file `index.html` and enter anything as the content. This isn’t important now as this editor here is OK to do some quick fixes, but doesn’t cut the mustard. Press the `Commit new file` button and you get a new file. Animation of creating an index file in the repository
  • Go to the `Settings` tab and select the `Pages` menu item. Make sure to pick the `main` branch from the dropdown menu and hit `save`. This makes what you are working on available as a URL on the web Animation of publishing pages on GitHub
  • Go back to the `Code` part of the repository and press the `.` button. This loads Visual Studio Code in the browser with this project open. You can now write your project using the full power of VS Code, including autocompletion and IntelliSense. Animation of opening VS code in the repository and editing the file
  • Once you are done, go to the `Source Control` option in VS code, enter a commit message and click the checkmark. This commits the changes to the repository. Animation of adding a commit message and submitting the file
  • You can see when your product is available online on the “Actions” tab of your repository. Check the “Pages build and deployment” workflow. It shows a yellow spinner until the page is ready. When it turns into a green checkmark your page is ready. Animation of the build process showing in the Actions tab of GitHub

For the video demo, the code is available at https://github.com/codepo8/greencircle and the in-browser version can be seen at https://codepo8.github.io/greencircle where `codepo8` is my GitHub user name and `greencircle` the name of the repository

Why not codepen, jsbin, codesandbox, jsfiddle… ?

There are dozens of places you can host and edit projects online and all of them have their benefits and problems. I really enjoy this way as it gives me the full functionality of Visual Studio Code and my project is in version control. I own all the code and can download it any time I want to. I can also allow other people to fork and change it.

Many of these features are also available in the other platforms and I really like that you can immediately see the results of your projects as you code them. But this feels like a great end-to-end solution requiring only one login I need for most of my work anyways. Incidently, if you want the immediate display of your project inside VS Code in the browser, you can also install the “Codeswing” :https://aka.ms/codeswing extension.

Edge DevTools for Visual Studio Code V2 – new browser preview with emulation and sourcemap support

Thursday, May 5th, 2022

The V2 version of the Microsoft Edge DevTools for Visual Studio Code extension is now live. We’ve worked hard to make the current feature set more stable and introduced new ones.

Screenshot of the V2 version on action

Console integration

Console Integration – makes it easier to use `console.log()` or interact with the document right from the developer tools. We found the old integration to be flaky and hard to find in the `Output` panel.

Console integration in the extensioon

Improved CSS Mirror editing

CSS Mirror Editing – making sure that none of your tweaks in DevTools get lost. This is now out of experiment and doesn’t use up as much screen estate any longer. You can enable and disable it in the Styles tool.

New interface to enable or disable CSS mirror editing

Updated issue reporting

Live issue reporting of problems in your code. If you have any code that is a problem you will see a wavy underline on it. You can hover over it with your mouse or use the `Problems` panel to learn what is wrong and how to fix it. We’ve updated the issue engine to make sure you get the latest and will soon offer ways to customise the issues you’d like to see. For now, we’ve removed Internet Explorer error reporting as it may rest in peace.

Live issue reporting flaging up a problem in the source code

Brand new browser preview with emulation

🆕 Screencast with emulation features – we added a brand new browser preview that doesn’t only give you the browser to interact with right in the editor but also offers various ways to emulate different environments. On the bottom of the browser preview you get a toolbar with various options:

The new emulation bar of the browser preview

First is the device list. You can select from a wide range of different emulated devices.

Device list showing various mobile phones and tablets

If you don’t select a device but choose `Responsive` instead, the browser will take up the whole available space. You can also define a viewport size using the form and rotate the viewport with the double arrow.

The magic wand menu allows you to simulate various CSS media queries, like print mode, dark/light mode or even simulate a forced colours (high contrast) environment. If you want to know more about forced colours, check this incredible article

The CSS emulation showing the document in forced colour mode with the menu offering other emulations

The last menu (currently using the eye icon) allows you to simulate different visual impairments, like seeing the page in a blurred fashion or in different “colour blindness” emulations.

The page being displayed in a blurred fashion and the menu offering more visual emulations

🆕 Sourcemap support for styles – means you can now debug the styles of Sass/React and other abstraction apps without leaving Visual Studio Code.

For lots more details you can also check the Changelog

Getting started with sourcemapped styles debugging

I’ve covered this here before when I asked for feedback, but now this should be much easier. If you open the Terminal you can do `npm i` and `npm start` to build your App and run the server. In this example, the app is now available at `http://localhost:3000`.

A demo react app with the terminal open

If you click the Edge icon you get the option to launch an instance of Edge or `Generate launch.json` file. Click the latter.

The generate launch.json button in the extension

This generates a `launch.json` file in a `.vscode` folder of your app with all the correct settings. Find all the instances of `url` and change them to `http://localhost:3000`:

Animation showing where to change the url of the app

Save the file and press F5. Visual Studio Code will start the debugger and open a browser window with your app and the developer tools right inside the editor.
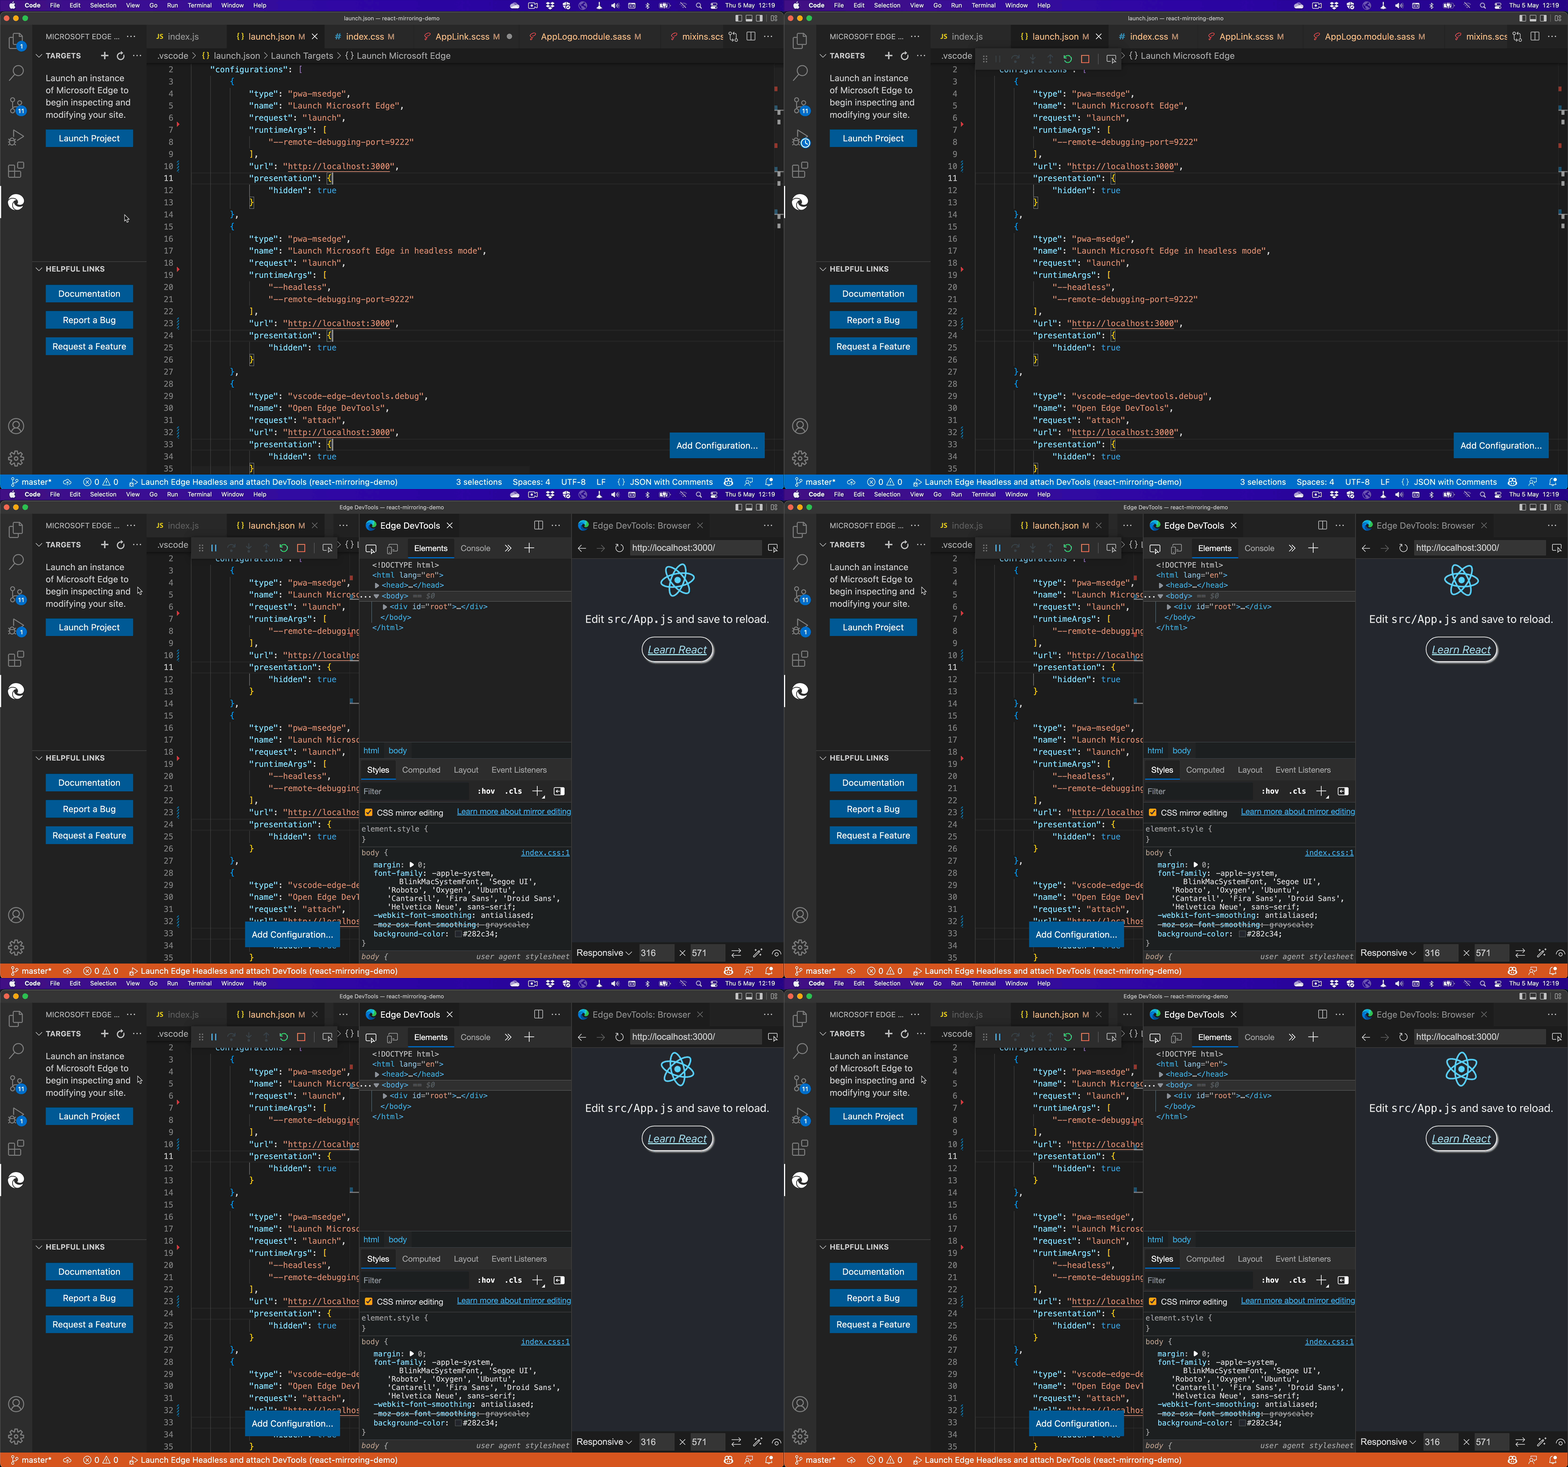
Visual Studio Code starting the debugger and opening the developer tools and the browser preview

If you now edit the styles of any of the elements of your app, you don’t only change CSS files in your project, but also their scss source files or modular styles.

Demo showing how changes in the developer tools now affect the source files, including Sass files and module scoped CSS

For this to work, you need to set up sourcemaps correctly in your project. As we assume this to be problematic for some people, we have an issue open in the extension repo where you can find help.