A quick reminder on how and why to use labels in forms to make them more accessible
Friday, December 4th, 2015Yesterday the excellent Alice Boxhall of the Google Chrome team pointed out an annoying bug to me:
Seen in the wild on https://wpdev.uservoice.com/forums/257854-microsoft-edge-developer …
It seems the UserVoice page of Microsoft Edge has a checkbox that is inaccessible to screen reader users. The reason is a wrong implementation of a label. So, here is a quick reminder of how to use labels in plain HTML (without any ARIA extras) and why that’s a good idea.
Labels are there to connect an explanatory text with a form element. For a sighted user this can seem redundant – after all, the text is right next to the element. But once you use a screen reader you see that by not using labels, you make it impossible for people to use your forms.
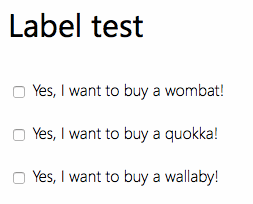
The markup used in this demo is the following:
<div> <input type="checkbox" name="wombat"> Yes, I want to buy a wombat! </div> <div> <label> <input type="checkbox" name="quokka"> Yes, I want to buy a quokka! </label> </div> <div> <input type="checkbox" id="yayforwallaby" name="wallaby"> <label for="yayforwallaby"> Yes, I want to buy a wallaby! </label> </div> |
On my Mac, using the in-built VoiceOver and Firefox, it is easy to test. Simply turn on VoiceOver Command+Fn+F5 and navigate using your keyboard by tabbing into the document. Here’s what that looks and sounds like:
In addition to the benefits for screenreaders, labels also make it easier for mouse or touch users to interact with your content. The following GIF shows that the options having labels enable the user to either click the tiny checkbox or the much larger text to check and uncheck.
Using labels isn’t hard. The simplest way is to nest the form element and the text inside the label:
<label> <input type="checkbox" name="quokka"> Yes, I want to buy a quokka! </label> |
If you can’t do that, you need to connect the label and the form element using a for/id pairing. Remember, a form element’s id has no meaning to the form. The data sent to the server is what’s defined in the name attribute. The id is only good for scripting, CSS and as a fragment identifier/anchor. The following example shows how to connect the form element and the label:
<input type="checkbox" id="yayforwallaby" name="wallaby"> <label for="yayforwallaby"> Yes, I want to buy a wallaby! </label> |
This is what’s broken in the UserVoice example: there is a for attribute on the label, but the form element has no id. Hence there is no connection between the two and the label becomes redundant.
Quick aside: if you wanted to write a test for that, remember that the for attribute in HTML elements can not be accessed as element.for as for is a reserved word. It needs to be htmlFor.
As a way to catch the mistake in the sign-up form, you could do the following:
var labels = document.querySelectorAll('label'); for (var i=0; i<labels.length; i++) { if (labels[i].htmlFor) { if (!document.getElementById(labels[i].htmlFor)) { labels[i].style.background = 'firebrick'; } } } |
Now, go forth and label the web!
Updates
- My colleague Aaron had a more detailed article last month
- Amelia Bellamy-Royds wrote a nifty upgrade to the script at the end.