Christian Heilmann

Author Archive

The joy of pixeling and building pixel tools with HTML5 canvas and JavaScript

Friday, April 17th, 2020

Some people knit, others do puzzles, and yet others find calm by colouring. Me, I love pixeling. My computer career started with a super basic computer. It didn’t even have a way to store what I programmed. So, every day, I would write myself a small program that allows me to paint on the screen using the cursor (there was no mouse). I’d paint something, turn off the machine and all was gone.

I love working within constraints, it fuels my imagination. I love trying to push the boundaries but also found a lot of happiness in making the best with what is possible.

Pixel logo saying Diversidty

The big computer of my youth was the Commodore 64. On this machine I did a lot of pixeling for the demo scene. A huge part of my professional network came from that sub-culture and it is fun to keep in contact with people you were in competition with in the 90s. The main input was keyboard and joystick. Painting swoops and natural shapes was tough. It meant knowing how to set pixels of the correct colours next to one another and let the human brain do the rest. Our eyes are lazy and our brain craves harmony. We’re happy to fill a gap between two points and make the design appear smoother to us than it is.

So, when I want to pretend I am artistically gifted, I go back to pixeling logos and fonts. Lacking space for a real Commodore 64, I use an emulator and some special tools. These have the same constraints as the real machine:

  • 16 pre-defined colours
  • 320Ë£200 pixels resolution
  • Two colours per each 8×8 square in hi-res mode
  • One background colour for the whole screen and 3 colours per each 8Ë£8 square in multicolour mode. In this code pixels are 1Ë£2 pixels and not 1Ë£1.

Tooling is fun these days, and Multipaint does an OK job to convert non-compliant graphics. My old Photoshop isn’t running on my current version of MacOS. So I started using PhotoPea in the browser for some of the conversions.

I soon discovered though that there are some things that are hard to do, so I wrote some tools to help myself. And for this, of course, I used JavaScript and canvas in the browser.

Canvas is awesome. Its paint API is odd and rudimentary, but I love that it turns any image into an array of pixels. And that you can manipulate things and then save them as a PNG.

So, to help myself paint some things for upcoming demos, I wrote a few tools in the browser. These are all open source and on GitHub. Have a peek and maybe there is something in there of interest for you.

C64 Colour Changer

C64 Colour Changer

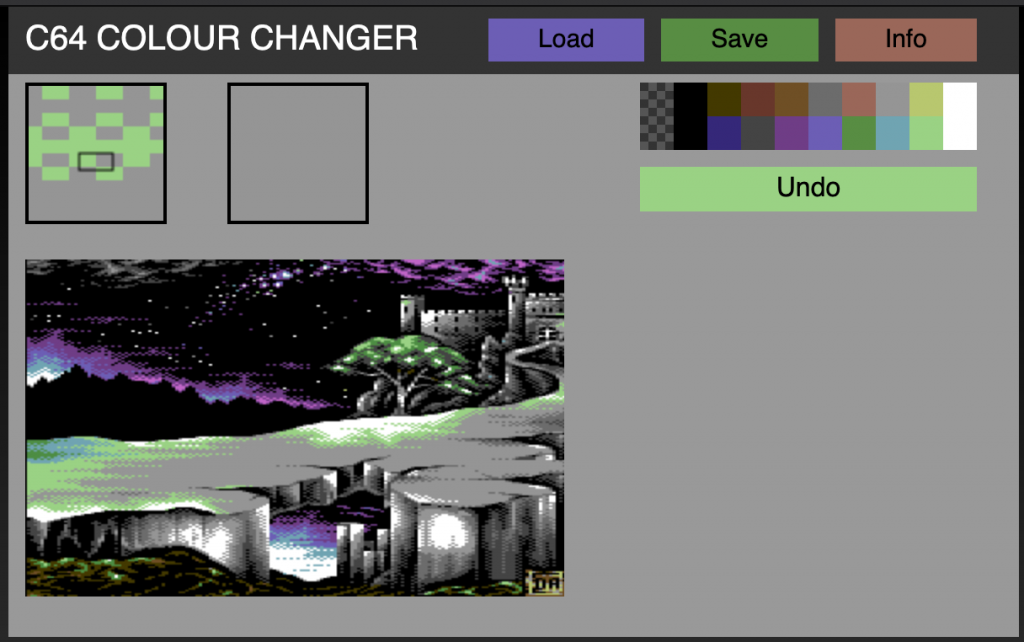
I lost a lot of my old floppy disks and some of my old work only exists as screenshots. And depending who did those the colours are off and I can’t remix or use them. Using a “select colour range” in PhotoPea is a pain, so I wrote a small tool to re-colour images.

You can check the Colour Changer here
and the source is on GitHub

TileEdit

Tile Edit Multicolour Mode

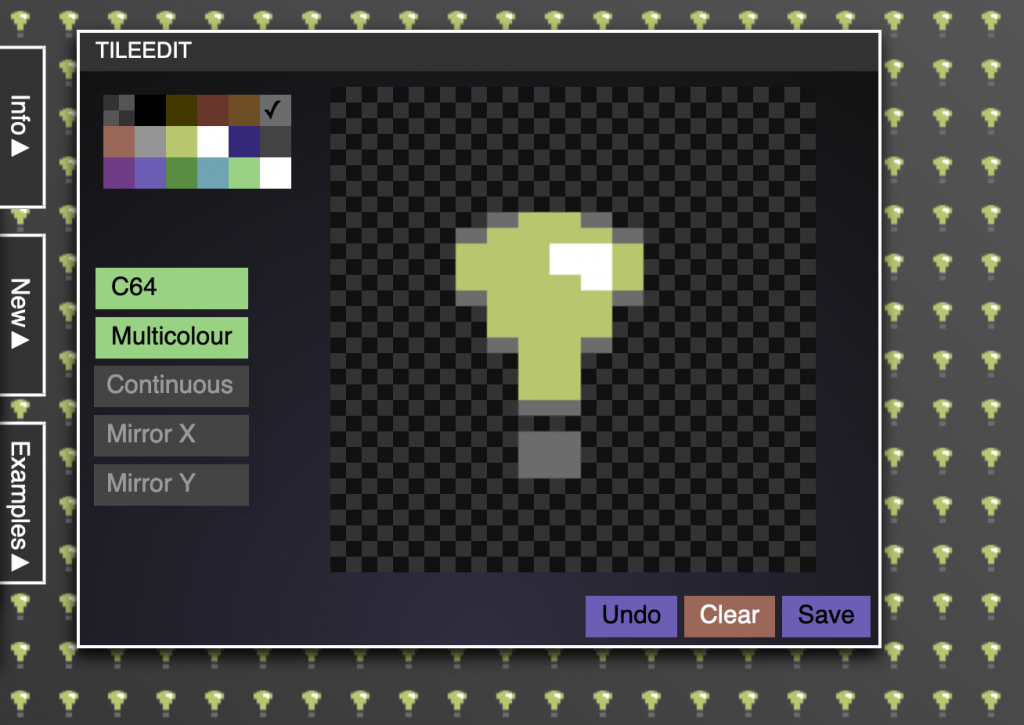
TileEdit is a small pixel editor that allows you to paint seamless tiles. I needed that for some 3D ball texture animation and no tool allowed me to to do what I wanted.

Tile Edit Hires Mode

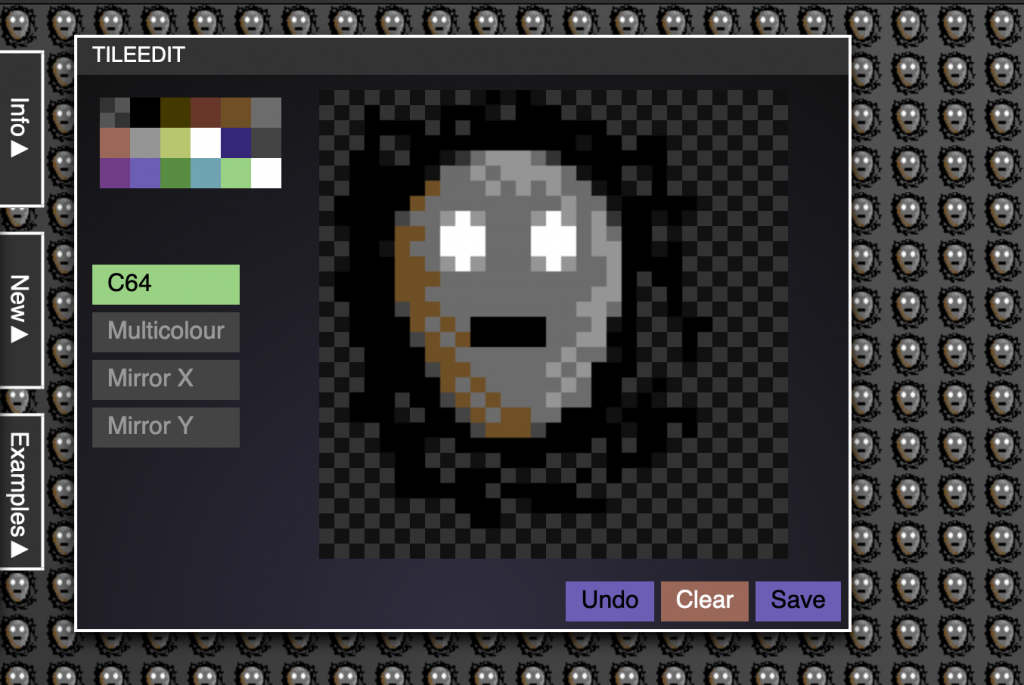
Now I can use this to paint C64 textures, and I also added a feature to paint general pixel textures. You can choose any colour with a colour picker and you are not limited to the C64 limitations.

The Tile Edit Source is also on GitHub.

Logo-O-Matic

Logo-O-Matic in the browser

I’ve written this in PHP using imageMagick ages ago and changed it to a canvas solution a few years ago. Now, Logo-O-Matic features 64 charsets (a lot by me). You can pick one, type your logo text, switch colours around, fix kerning and word spacing, add a character offset and save your cool retro logo.

jenkins in an old 8 bit font

linkedin in an old 8 bit font

github in an old 8 bit font

The Logo-O-Matic source is also on GitHub.

Ongoing work

I love the simplicity of pixeling and its repetitive nature. I especially the way you can create a whole charset from the “8” character and changing a few pixels around. And I love that I can use plain vanilla JavaScript to create myself tools that I don’t get otherwise. Maybe you can also find some joy in this.

But now back to work on the lovely Edge browser and compatibility

Edge Logo in C64 Mode

Firefox Logo in Multicolour

Quick solution: getting the mouse position on an element regardless of positioning

Thursday, April 2nd, 2020

As I was upgrading an older codebase of mine that used layerX and layerY I looked into a very succinct way of finding the current mouse position on any element regardless of its position, scrolling, padding, margin and such and I found this to work for me, so maybe it is good for you, too.

const getposition = ev => {
  let x = ev.clientX;
  let y = ev.clientY;
  let pos = ev.target.getBoundingClientRect();
  // the bitwise shift |0 rounds non-integer values down.
  // if you want to round up, use 1.
  return {
    x: x - pos.x|0,
    y: y - pos.y|0
  };
}

Here’s a codepen of it in action, and you can play with it and give it more annoying things to deal with.


See the Pen
Get mouse position on element.
by Christian Heilmann (@codepo8)
on CodePen.


#workfromhome – If you value your colleagues, use a headset

Wednesday, March 25th, 2020

I’ve been working from home and 8-9 hours away from my colleagues for the last 8 years and mostly on the go. My work setup is a laptop and wherever I have space to sit. This teaches you quite a few things about remote work and – more to the point – what doesn’t work.

Therefore here is a plea of mine that is based on a few questions people asked me lately what the best thing to do to make remote working using messaging software work. And here it is: use a headset.

Chris wearing headset

Any distraction to a video or audio call is bad. And they multiply with all the colleagues on the call. It is tough enough to make sure everyone is understood and hears everything. Distracting sounds are not helping there.

To me, using a headset means a few things:

  • The only audio people hear from me is my voice. Not what is happening in the room, not any of my bodily functions
  • I can type notes of the meeting I am in without adding a drum and bass soundtrack to the meeting
  • I switch from “doing something” mode to “being in the meeting” mode
  • I hear when my Microphone is on. My own voice only can be heard in the headset when it is on. You don’t want to be in an uncertain stage if your mic is on or not.

As to which headset to use, I don’t care. I am doing fine with my Plantronics Blackwire 500 C520-M, as its sound quality is great and it is comfortable to wear. You can go much fancier of course and if you work in a noisy home maybe adding noise cancellation is a great idea. I got my headset from my company and I am pretty sure most companies will be OK with you ordering a headset.

So that’s a quick one, but it really makes a difference.

Fun with browsers: how to get an image into the current page

Friday, March 20th, 2020

Having been a web developer for as long as I have can get you tainted. You always assume things to break in one way or another or some clever new web API not getting the support it needs for ages. As it turns out, the speed with which browsers adapt to standards has become increasingly faster. That’s why it is important to keep up to date and give yourself simple challenges to see if tasks that in the past were a huge hassle have now become easier.

That’s what I did today. I gave myself the task to build an interface to make it as easy as possible for a user to add an image into the document. I wanted to support:

  • Image upload
  • Drag and Drop
  • Copy and Paste

Looking at Stackoverflow for some solutions is a huge disappointment as many solutions either are woefully outdated. Looking through the specs and at Can I use, I found it is excitingly short code you need to accomplish all of the above.

This Codepen shows the final outcome and works swimmingly here on Edge, Firefox, Safari and Chrome.

And the full code is not that much.

In the HTML we need to have a container element that is a drop target (I made this cover the whole document in CSS).

    <div id="container">
      <h1>Getting an image into the browser</h1>
      <p>Drag and Drop and image, paste it, or use the upload bar below</p>
      <div>
          <input id="getfile" type="file" />
          <label for="getfile">Upload an image</label>
      </div>
      <div id="imagecontainer"></div>
      <output></output>
    </div>

The JavaScript needs to reference those and set the appropriate event handlers. The rest is looking at the URL standards.

(function(){
const fileinput = document.querySelector('#getfile');
const output = document.querySelector('output');
const imagecontainer = document.querySelector('#imagecontainer');
 
/* Show the image once we have it */
const loadImage = (file, name) => {
  if (name) {
    output.innerText = 'Filename: ' + name;
  }
  var img = new Image();
  img.src = file;
  img.onload = function() {
    imagecontainer.appendChild(img);
  };
}
 
/* Image from Clipboard */
const getClipboardImage = (ev) => {
  let items = ev.clipboardData.items;
  for (var i = 0; i < items.length; i++) {
    if (items[i].type.indexOf('image') !== -1) {
      var blob = items[i].getAsFile();
      loadImage(window.URL.createObjectURL(blob));
      break;
    }
  }
}
window.addEventListener('paste', getClipboardImage, false);
 
/* Image from Drag and Drop */
const imageFromDrop = (e) => {
  var file = e.dataTransfer.files[0];
  loadImage(window.URL.createObjectURL(file), file.name);
  e.preventDefault();
}
container.addEventListener('drop', imageFromDrop, false);
// Override the normal drag and drop behaviour
container.addEventListener('dragover', (ev) => {
  ev.preventDefault();
}, false);
 
/* Image from Upload */
const imageFromUpload = (e) => {
  var file = e.target.files[0];
  loadImage(window.URL.createObjectURL(file), file.name);
  e.preventDefault();
}
fileinput.addEventListener('change', imageFromUpload, false);
 
})();

We live in exciting times for web developers, don’t let yourself be bogged down by slowness of the past. I’m still having fun with it.

Quick developer tools tip: simulating dark/light colour mode

Thursday, January 30th, 2020

Newer operating systems come with a dark/light mode option and also a “prefers reduced motion” mode. This also affects our products and we should test them in these modes to make sure there is no glaring problem. There is also a high contrast mode in Windows which is an accessibility feature that should be on our radar to test for.

Now, to avoid having to change your whole OS to test for this, browser developer tools have simulators for these modes.

In Microsoft Edge, these are in the “more tools” section.

Here’s the journey;

  • Click the “...”
  • Select “More tools”
  • Select “Rendering”
  • In the lower console, scroll down to “Emulate CSS media feature prefers-color-scheme” and toggle.

Here’s a screencast showing it in action .

If you prefer screenshots of the journey, here they are:

Finding the rendering menu in Microsoft Edge devtools

Colour scheme emulation menu in Microsoft Edge devtools

Now, on a personal note, I think these are kind of hidden and I am not surprised people don’t know about that. Given that we are also considering extending these to add more emulations (like high contrast mode) the question is what we could do to make this easier.

One way is to use the keyboard shortcuts. You can open the developer tools and press Ctrl/Cmd + Shift + P and type “dark” or “light”. Make sure to select the rendering parts of the menu though and not switching the theme of the devtools themselves.

keyboard access to simulator

This is not a Microsoft Edge specific functionality, any Chromium based browser has this.

Do you have any idea how to make this even easier? Please report issues you find using the feedback tool in the developer tools:

Feedback mechanism in developer tools

You can also always ping me @ codepo8 or the official Microsoft Edge Devtools account @ EdgeDevTools on Twitter.