Christian Heilmann

You are currently browsing the Christian Heilmann blog archives for August, 2023.

Archive for August, 2023

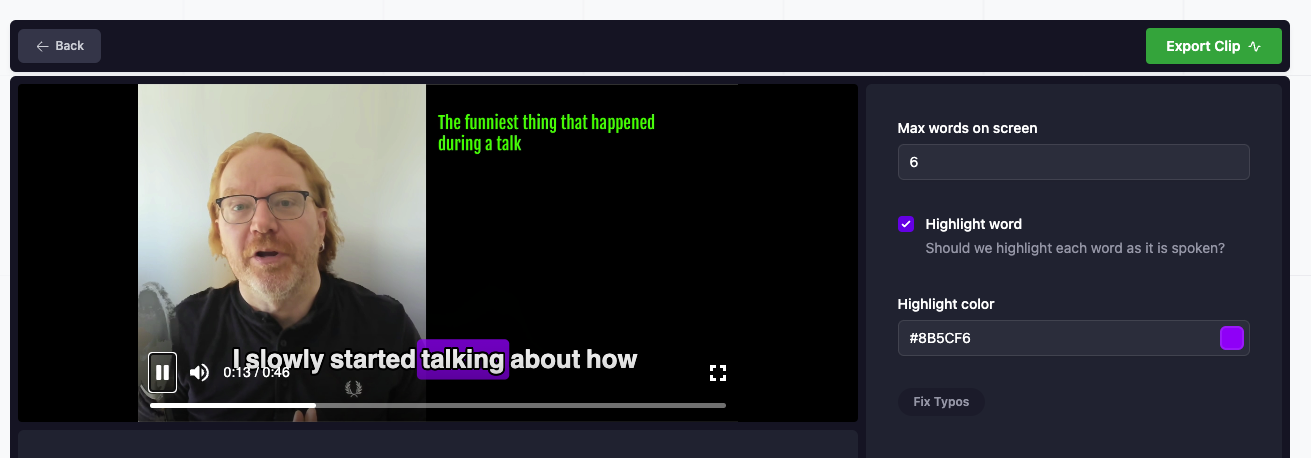
Adding sound wave overlays to videos and pictures using FFMPEG

Thursday, August 31st, 2023

In order to fix a broken video where the camera stopped recording, I wanted to replace the part with a video with a sound wave overlay. There are many services for that, and it is also a feature of video editing software. But I am stingy and a geek, so I wanted to use FFMPEG on the command line instead. This also allows for batch processing.

Note: I didn’t embed the videos in this post but GIFs instead. The real videos play the video and audio and the sound wave moves accordingly.

Let’s say this is our original video:

Video of me talking about public speaking

This is what it looked like in the end:

The same video with a sound wave on top of it

Here’s the command I used to create the above version:

ffmpeg -i Understandable.mp4 \
 -filter_complex "[0:a]showwaves=colors=0xff1646@0.3\
 :scale=sqrt:mode=cline,format=yuva420p[v];\
 [v]scale=1280:400[bg];\
 [v][bg]overlay=(W-w)/2:H-h[outv]"\
  -map "[outv]" -map 0:a -c:v libx264 -c:a copy \
  waveform-sqrt-cline.mp4

OK, let’s unwrap this:

  • `Understandable.mp4` is the input file
  • `0xff1646@0.3` is the hexadecimal colour of the waves I want to create. The `@0.3` is the opacity, 30%.
  • The first `scale` is how the bars should be resized to stay in a certain range. I found squareroot to look the best. Other options are available in the documentation
  • `mode` is what soundwave you want. This version, `cline` is a centered, filled line. Other options are `point`, `line` and `p2p`.
  • `scale` is the size of the generated video of the wave, in this case 1280×400 pixels (as the video is 1280×1080)
  • The `overlay` defines where on the background video the wave should appear. In this case centred in the horizontal direction and on the bottom of the video.
  • `waveform-sqrt-cline.mp4` is the name of the final video.

Change location of the sound wave

You can also center the sound wave in both directions using `overlay=(W-w)/2:(H-h)/2`:

ffmpeg -i Understandable.mp4 \
 -filter_complex "[0:a]showwaves=colors=0xff1646@0.3\
 :scale=sqrt:mode=cline,format=yuva420p[v];\
 [v]scale=1280:400[bg];\
 [v][bg]overlay=(W-w)/2:(H-h)/2[outv]"\
  -map "[outv]" -map 0:a -c:v libx264 -c:a copy \
  waveform-sqrt-cline-centered.mp4

And the result looks like this:

Video showing the sound wave in the vertical center

Other sound wave styles

And you can change the output type to line and change the colour:

ffmpeg -i Understandable.mp4 \
 -filter_complex "[0:a]showwaves=colors=0xffffff@0.5\
 :scale=sqrt:mode=line,format=yuva420p[v];\
 [v]scale=1280:400[bg];\
 [v][bg]overlay=(W-w)/2:H-h[outv]"\
  -map "[outv]" -map 0:a -c:v libx264 -c:a copy \
  waveform-sqrt-line.mp4

Video showing the sound wave as lines

This is what the point to point mode looks like:

ffmpeg -i Understandable.mp4 \
 -filter_complex "[0:a]showwaves=colors=0xffffff\    
 :scale=sqrt:mode=p2p,format=yuva420p[v];\ 
 [v]scale=1280:400[bg];\
 [v][bg]overlay=(W-w)/2:H-h[outv]"\
  -map "[outv]" -map 0:a -c:v libx264 -c:a copy \
 waveform-sqrt-p2p.mp4

Video with point to point line

Adding a sound wave to a static image

If you only want the audio from a video and use a background image instead, this is what to use. This creates a 400×400 pixel video with the image as the background and the sound wave on top:

ffmpeg -i Understandable.mp4  -i chris.jpg\
 -filter_complex "[0:a]showwaves=colors=0xff1646@0.3\
 :scale=sqrt:mode=cline,format=yuva420p[v];\
 [1:v]scale=400:400[bg];\
 [bg][v]overlay=(W-w)/2:(H-h)/2[outv]"\
  -map "[outv]" -map 0:a -c:v libx264 -c:a copy \
  static-image.mp4

Soundwave on top of a static image

FFMPEG is amazing

Granted, the syntax of FFMPEG is pretty nuts, but it is also super powerful. Want to know for example how I created the GIFs of this post?

First, I resized all the MP4s in the folder to 1/3 of their size and saved them as small*:

for f in *.mp4 ; \
do ffmpeg -i "$f" -vf scale=w=iw/3:h=ih/3 "small-$f" ;\
done

Then I took those and created gifs

for f in small-*.mp4 ; \
do ffmpeg -i "$f" -sws_dither ed -ss 5 -t 1 "e-$f.gif" ; \
done

In English: Get all small-*.mp4s in the current folder, and create a GIF from second 5 of the video, one second long, using error diffusion.

Automate all the things!

Soundwave from transformers pressing a button

New feature in VideoTap: Clips – create short excerpt videos from bigger ones by highlighting text in the transcript

Saturday, August 26th, 2023

VideoTap keeps getting better and better. The latest version now has a new feature called Clips which allows you to create short excerpt videos from larger ones by selecting a part of the text in the transcript.

When you upload a video, VideoTap automatically creates a transcript, which is used to create the AI powered blog post, tweets and other social media texts. It now also detects interesting quotes in the video and creates short videos from them to use on Instagram, TikTok or other short video platforms to advertise the full version. You get a selection of those when you go to to the dashboard of your video and choose “clips”:

The clips part of the VideoTap menu shows several clips it generated automatically from the transcript for you to choose from. These already animate so you can see the result immediately.

The videos show the transcript part as a caption with highlight on the current word. You can customise this to your needs and even fix typos as necessary.

The clip preview shows the video and allows you to define how many words should be shown on the screen at any time, the colour highlight and provides a way to fix typos

Instead of using these automatically detected clips, you can also highlight a part of the text and generate a clip that way. To do this, activate the “Create a Clip” button on the clips page or highlight a different part of the transcript:

You can also highlight any part of the text and VideoTap will generate the video for you.

Once you’re happy with the result, activate the export clip button and after a while you can download your video.

I’m currently looking at all the videos of the WeAreDeveloper World Congress, and this will be a great tool to make the job of reusing those a lot easier.

Try VideoTap here .

Hemingway is now Hemingw-AI! My favourite writing tool just got an AI upgrade and it’s great.

Friday, August 25th, 2023

Disclaimer: I got no affiliation with Hemingway other than paying for it. I am just genuinely excited about this.

Hemingway is an app I use almost daily. It is a text editor that shows you when your language gets too hard to read. It advises you to keep shorter sentences and avoid complex language. It also tells you the reading grade level your readers need for your texts.

Hemingway editor showing a text with a lot of complex sentences coloured in different ways to indicate that I should edit it.

What I like most about it is how unobtrusive the editor is. It is very bare-bones but does what you expect of a text editor. I’ve seen a lot of “smart” writing suites that fail at the first hurdle by not providing a simple editor to start with.

Hemingway colours problematic parts of your text as you type it. This is an interaction that’s pretty common – think of spellcheckers in any editing suite. You have a legend on the right hand side explaining you what each background colour means.

You get the amount of words and a readability grade for the whole document. You can also see the Sentence count, paragraphs and expected reading time.

In the latest beta, Hemingway, much like any other tool these days, got an “AI” upgrade. The editor now not only tells you that something is wrong, but you can also ask it to fix the issues for you. Here’s how that looks:

Hemingway Editor fixing a complex sentence by offering a simpler one

This is nothing groundbreaking. Almost any editing suite I work with has an AI feature. But what I like here is how unobtrusive it is. AI becomes and editorial step, not a creation step. You can also hit ‘/’ to ask the editor to continue writing, as shown in this recording:

Other editors I tried that touted AI capabilities does this in a much more intrusive manner. Instead of a “let me help you write more”, they shouted “become a great writer at the push of a button”. It is especially annoying when they then to fail to provide content in a format akin to my writing style. If you ever see a text by me that uses the word “utilize” or “finding synergies”, rest assured that I’ve been kidnapped. And check the text for a cypher with information how to help me.

Ironically, it seems that AI created text by Hemingway fails to adhere to its simplicity rules as shown in this recording.

Generated text content of Hemingway fails to adhere to its own simplicity rules

Something to fix soon, I suppose.

Check the following YouTube video for a quick walkthrough where I edited one of my last blog posts.

All in all, this is a great example how to add AI to aid the writing process. Not to replace it with automated text optimised for machines or SEO. I like it and look forward to see more of what’s coming next.

Quick tip: Getting all links from any web site into a spreadsheet using browser developer tools

Thursday, August 24th, 2023

As part of taking over the editorial job of the WeAreDevelopers newsletter, I needed to get all the links from older editions and import them into a spreadsheet. Eventually I will write a scraping script, but there is a much simpler way to get all the links from a web site into a spreadsheet: browser developer tools. You can follow how that’s done in this video:

The step-by-step instructions:

  • Go to the web site you want the links from
  • Open Developer Tools (press F12)
  • Go to the Console tool
  • Enter (or copy and paste) the following: console.table($$('a'),['innerHTML','href'])
  • Highlight the table with your mouse
  • Copy and paste into your spreadsheet, making sure to only copy the values

This works in Microsoft Edge, Google Chrome, Firefox but for some reason not in Safari

Another issue is that long links and link texts get shortened with a … in Chrome and Edge, to work around that you need to shorten the links first. In my case, I removed the `utm_source=` tracking info. To this end, I had to write another short script in the console to run first.

Using $$('a').forEach(l => {l.href = l.href.replace(/?utm_source=.*$/,'')}) replaces all the utm_source tracking info on each link before calling the console.table.

Adding GitHub repository info, pages links and latest commits to any page using github-include

Tuesday, August 22nd, 2023

GitHub is where code lives. You make your updates there, and in the case of frontend work, you can even host it in GitHub pages.

When I publish something, I write a blog post and often I put some of the code in the post. When feedback comes in about new features I update the code and then I dread to also update the blog post. So, instead, I wanted to find a way to offer a link to the GitHub repo that shows the main link, a link to the GitHub pages, and show the latest commits. This allows people to see what changed in the code without me changing the post.

To make this happen, I wrote github-include, a web component that allows you to add a link to a repo to your blog post. It then converts it to a card showing the main repo link, a link to the GitHub Pages demo and the last x commits.

For example, the following HTML code gets converted to the card shown as an image here:

<github-include commits="5" pages="&#x1f30d;" links="true">
    <a href="https://github.com/codepo8/mastodon-share">
       Mastodon Share
   </a>
</github-include>

Recording of the web component in action

By default, it detects the setting of your OS and displays either as a dark or a light theme. If you don’t want any styling at all, you can also use plain HTML instead of the web component:

<div class="github-include" 
     data-commits="5"
     data-pages="&#x1f30d;" 
     data-links="true">
  <a href="https://github.com/codepo8/mastodon-share">
  Mastodon Share
  </a>
</div>

You can see it in action on the demo page .

You can customise all the functionality and labels of the component using attributes. These are all documented in the README .