Christian Heilmann

You are currently browsing the Christian Heilmann blog archives for November, 2020.

Archive for November, 2020

Back to Basics: Creating a clickable card interface in plain HTML, CSS and JavaScript

Thursday, November 26th, 2020

One request that keeps coming up in web design right now are card interfaces that work like this:

  • They should have headings and text and link to another document
  • You should be able to click anywhere on the card to go to the other document
  • Except, there could also be inline links in text that should go to another document
  • And they should have a button to close them

Basically this:

Animation of the card demo in action

The problem with that interface is that whilst anchor elements can contain other elements, nesting them makes no semantic sense and is invalid HTML.
So if you tried:

  <a href="#1">One 
    <a href="#2">Two</a>
  </a>

The HTML parser rightfully would kick the second link out.
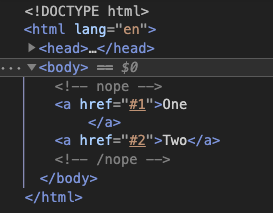
the HTML parser fixing the invalid HTML in the browser

We need to be cleverer about this. I wanted to work with that and play with some features of the browser developer tools at the same time. That’s how I came up with a clickable card interface in 50 lines of CSS and 11 lines of JavaScript.

You can take a look at the source code of the solution on GitHub and also play with it there.

I explain in detail what’s happening here in this ~15 minute video tutorial on YouTube.

The Developer Tools features in use are:

I also tested an earlier version of the card interface in the browser and with Voiceover on Mac.

Here are the steps to make it happen:

Using semantic HTML

<ul class="fullclick">
  <li>
    <h2>Dogs</h2>
    <p>
      Dogs are excellent, and good people. If want to browse dogs
      by breed, check <a href="https://codepo8.github.io/dog-browser/">
      The dog browser</a>. Almost all dogs are good boys and girls. 
    </p>
    <a href="dogs.html" class="main">More dog news</a>
    <button title="click to close" aria-label="click to close">x</button>
  </li>
  <li>
    <h2>Wombats</h2>
    <p>
      Wombats are cute as buttons and digging machines. They look always
      chill and jolly, but aren't a good idea to keep in the house.
    </p>
    <a href="wombat.html" class="main">More wombat info</a>
    <button title="click to close" aria-label="click to close">x</button>
  </li>
</ul>

  • An unordered list is easy to style and will also tell screenreaders that the items are linked. It will even announce “1 of 2”, “2 of 2” and so on.
  • Using a button with an aria-label to close the card makes it keyboard accessible and screenreaders won’t read “button x” which doesn’t give much information.

Making the whole card clickable

  • Positioning each list item relative makes sure all positioned elements are contained in it.
  • Create an overlay over the whole list item that links to the document works with CSS generated content. Setting a z-index of 1 makes sure this covers all elements without positioning.

.fullclick li {
  list-style: none;
  margin: 1em 0;
  padding: 20px 10px;
  background: #2b2b2b;
  position: relative;
}
.fullclick a.main {
  color: #85baff;
  text-align: right;
  display: block;
  z-index: 1;
}
.fullclick li a.main::after {
  position: absolute;
  top: 0;
  left: 0;
  right: 0;
  bottom: 0;
  content: ' ';
}

Making inline links and buttons interactive

  • Positioning the inline links relative and the button absolute and giving them a z-index of 2 makes sure they can be interactive above the overlay.
  • Using event delegation we can make each button remove the parent element on click

Making the interaction smoother

  • Highlighting the current card on hover and on focus-within in CSS makes it easier to realise where you are on the screen
  • Triggering a new transition on click of the button and listening to the transitionend event means the card fade out
  • Checking the ‘prefers-reduced-motion: reduce’ CSS media query with matchMedia ensures that users with animation turned off don’t get any

The different stages

  • Unstyled Version – the bare bones HTML without any styles or scripts – works only as a list.
  • Clickable Card – you can click the whole card to go to the link destination
  • Adding Button and Links – adding the HTML for inline links and closing buttons. This doesn’t do anything as they are still covered.
  • Fixing Button and Links – setting the inline links to relative and upping the z-index
  • Adding Hover Effects – making it look nicer and more obvious which card you are on
  • Hiding on Click – adding the click handler
  • Hiding Smoothly on Click – adding the transition
  • Final – all together working in harmony
  • Debug – debugging version showing what happens when you click on elements rather than leaving the page
Shifting an image with canvas

Monday, November 23rd, 2020

As part of my Tile Editor I needed a way to shift an image by x pixels left, right, up or down. I didn’t need to move the image, I needed to shift the pixels of the image. This allows you now to shift the image and thus makes painting seamless tiles much easier.

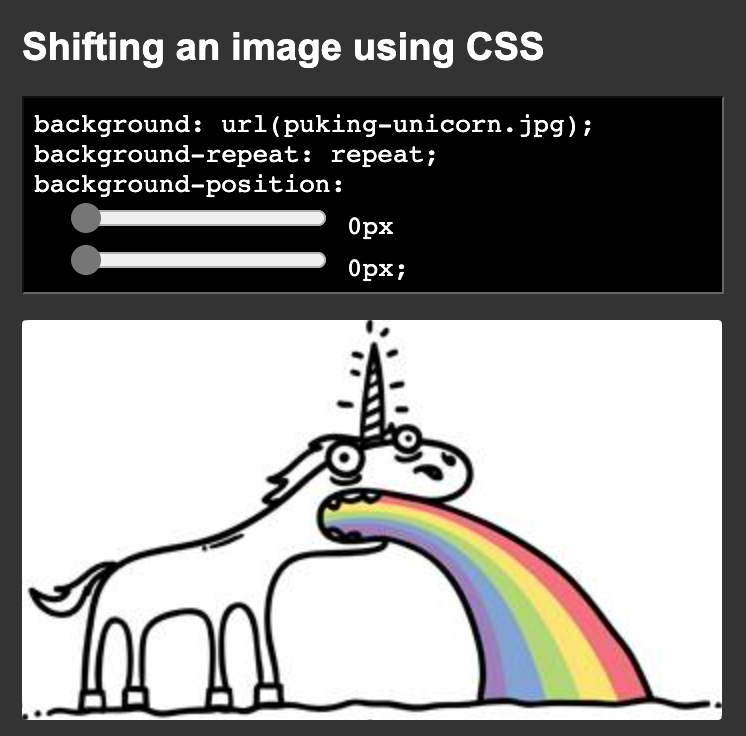
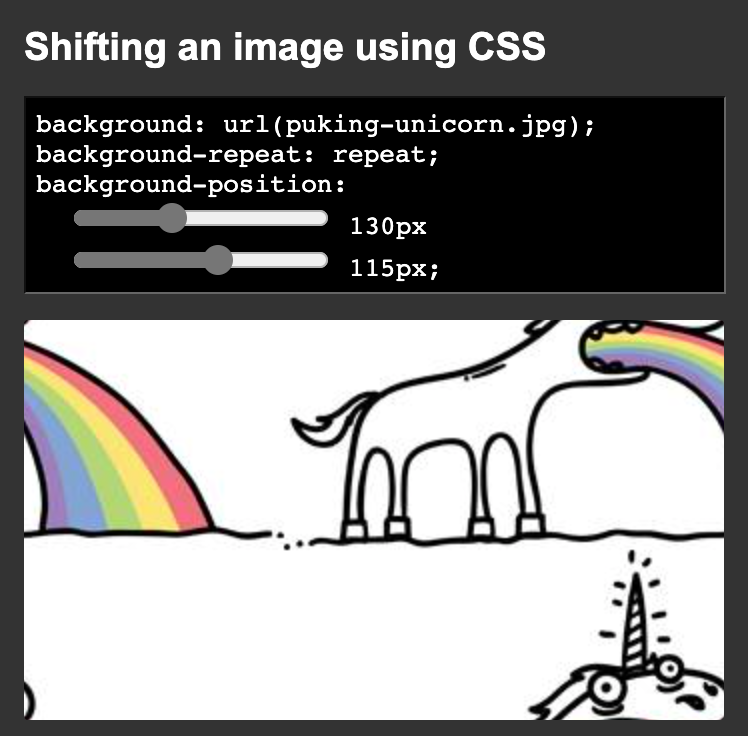
Now, visually this is easily done using CSS. You can use the image as a background, define background-repeat as repeat and offset the image using background-position. You can play with this here :

This is pretty straight forward and performs well (as a test, click the image in the above demo for some useless fancy stuff. Click again to stop it).

With background position being zero in horizontal and vertical the image is just the image:

Unshifted image of puking unicorn

When you set the the horizontal offset to 130 and the vertical to 115 you get a shifted image and the image data gets repeated:

Unshifted image of puking unicorn

But it is only visual. You don’t really change the image data – you just display it. If I wanted users to shift the image and save it, they’d have to create a screenshot.

Canvas to the rescue – shifting an image

Now, manipulation of image data can be done using HTML canvas. You can manipulate images pixel by pixel, but – even better – you can slice parts of the image out, cache it, manipulate the image and then paste the sliced part again.

For example if you wanted to shift the data 100px to the left, you’d need to slice out a 100px wide part of it on the left, move the rest of the image to the top left corner of the canvas and paste the slice 100px from the top right corner of the canvas.

As code, this looks somewhat like this:

// Create canvas, store context and add to DIV
let c = document.createElement('canvas');
let cx = c.getContext('2d');
document.querySelector('div').appendChild(c);
 
// load image and 
// resize canvas to be the same size as the image
let i = new Image();
i.src = 'puking-unicorn.jpg';
i.onload = function() {
  c.height = i.naturalHeight;
  c.width = i.naturalWidth;
  cx.drawImage(i, 0, 0);
}
 
// Slice method to shift image 
const slice = _ => {
  // get image data from the top left to 100px from the left
  // store it as slice
  let slicedata = cx.getImageData(0, 0, 100, c.height);
  // get image data from the 100px left to the end of the image
  // store it as slice
  let restdata = cx.getImageData(100, 0, c.width, c.height);
  // clear the canvas (not needed, but safe)
  cx.clearRect(0, 0, c.width, c.height);
  // put the restdata to the top left of the canvas
  cx.putImageData(restdata, 0, 0);
  // put the slice data 100px from the right on the canvas
  cx.putImageData(slicedata, c.width - 100,0);
}
 
// if the user clicks on the image, move it
c.addEventListener('click', slice);

You can try it out here and the best way to see what it going on is to turn on debugging and set a breakpoint.

This takes care of shifting to the left. If you want to move the image right, to the bottom or up, you need to tweak the coordinates for the slices accordingly. The following animation show how this is done. Click the different buttons to see the steps to move the image around.

Making it generic: CanvasShift.js

This takes a bit of fiddling, so I thought I make it easier and created CanvasShift.js.

This allows you to shift any canvas by x and y pixels. You can see it in action by trying out the test page .

This would make our first example of shifting 100px to the left the following:

<script src="canvasshift.js"></script>
<script>

    let c = document.createElement('canvas');
    let cx = c.getContext('2d');
    document.body.appendChild(c);
    let i = new Image();
    i.src = 'puking-unicorn.jpg';
    i.onload = function() {
      c.height = i.naturalHeight;
      c.width = i.naturalWidth;
      cx.drawImage(i, 0, 0);
      canvasshift(c, -100, 0);
    }

</script>

For other shifting, use different parameters. For example to shift the image 100 pixels to the right and 20 pixels up, you use canvasshift(c, 100, -20), to move 15px left and 20px down, canvasshift(c, 15, 20) and so on…

If the loading part is annoying to you, you can also use the load method of the script:

let c = document.createElement('canvas');
document.body.appendChild(c);
const shift = _ => {
  canvasshift(c, -200);
}
canvasshift.load(c, 'puking-unicorn.jpg', shift);

This one takes three parameters, of which the last one is optional. The first is the canvas, the second the url of the image (this needs to be on the same domain – or a cors-enabled one) and a callback method that will be called once the image was successfully loaded.

Summary

Whilst CSS should be enough in most of the cases you want to do some image shifting, this should get you on the way. There are more options in canvas like defining images as patterns an using transform, but for non-animated shifting this seems to be the easiest option.

Quick hack: How to make the new CSS Overview feature of Chromium Devtools shareable

Thursday, November 12th, 2020

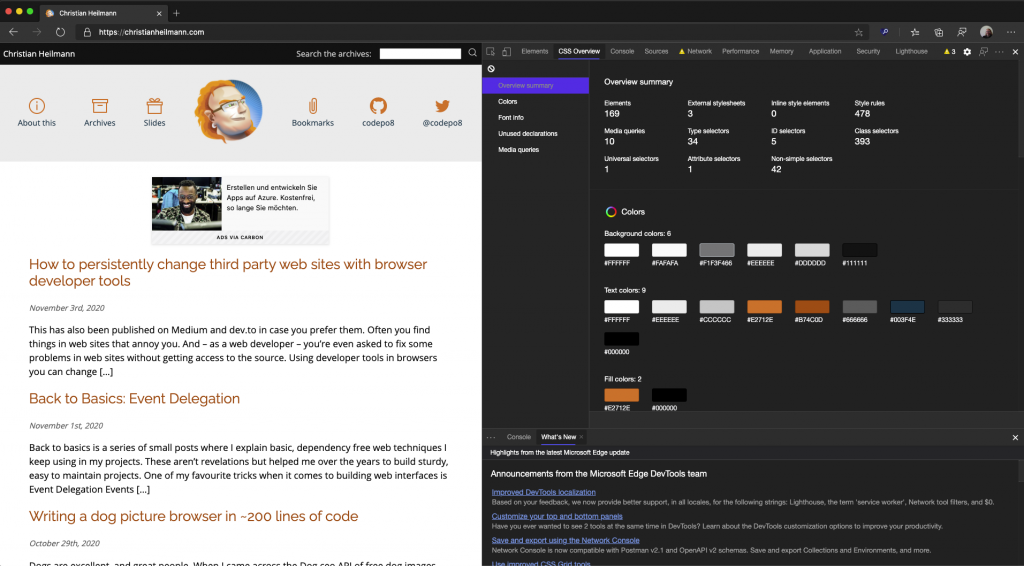
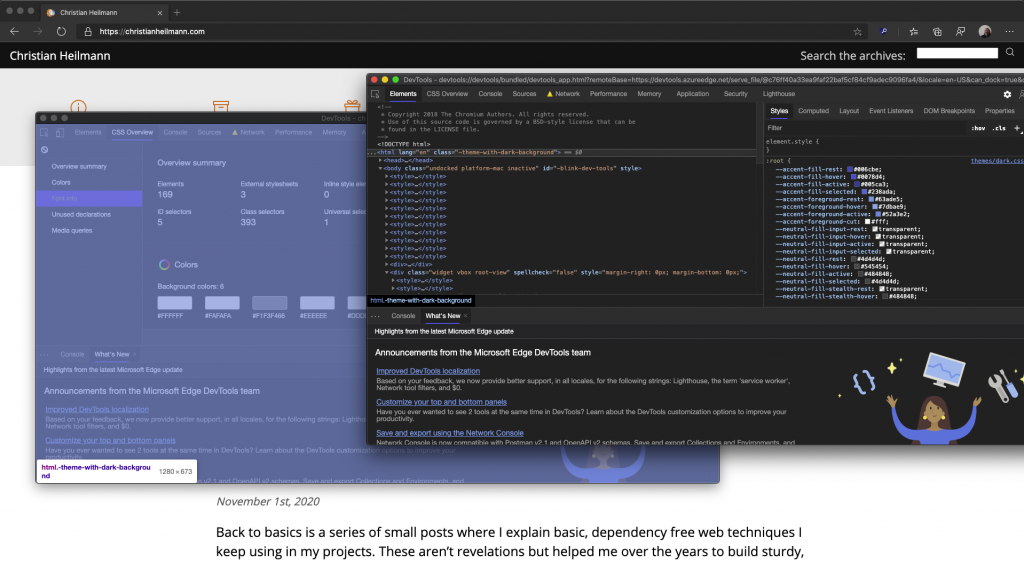
Ok, I am an impatient person. I also love to hack around with things. You may or may not know about an experiment in Chromium Developer Tools called CSS Overview. What it does is give you an excellent report about your web site’s CSS:

CSS Overview Results for this blog

You can see statistics about the CSS like how many selectors you used, you get an overview of all the colours, learn about contrast issues and which fonts you used.

It is a bit like a style guide, but generated from the CSS used in the document. Now, I’d love this to be shareable with third parties to show, for example, a client what they’ve done wrong in their CSS. But for now, this isn’t a feature yet.

However, there is a quick and dirty way to make the results shareable. You can watch the screencast on YouTube or look at the instructions below.

Here’s how to do this step-by-step.

  1. Go to the site you want to get the CSS overview from
  2. Open Developer tools (CMD|Ctrl+Option+I)
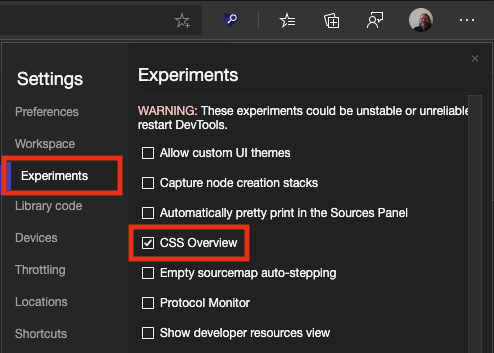
  3. If you haven’t got CSS Overview yet, go to the settings (the little cog), pick “Experiments” and select on the CSS Overview option
    Turning on CSS overview in the developer tools experiments
  4. Restart DevTools
  5. Go to the CSS Overview Tab and press the “Capture Overview” button – you should get your report
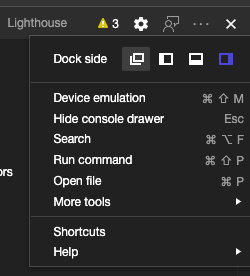
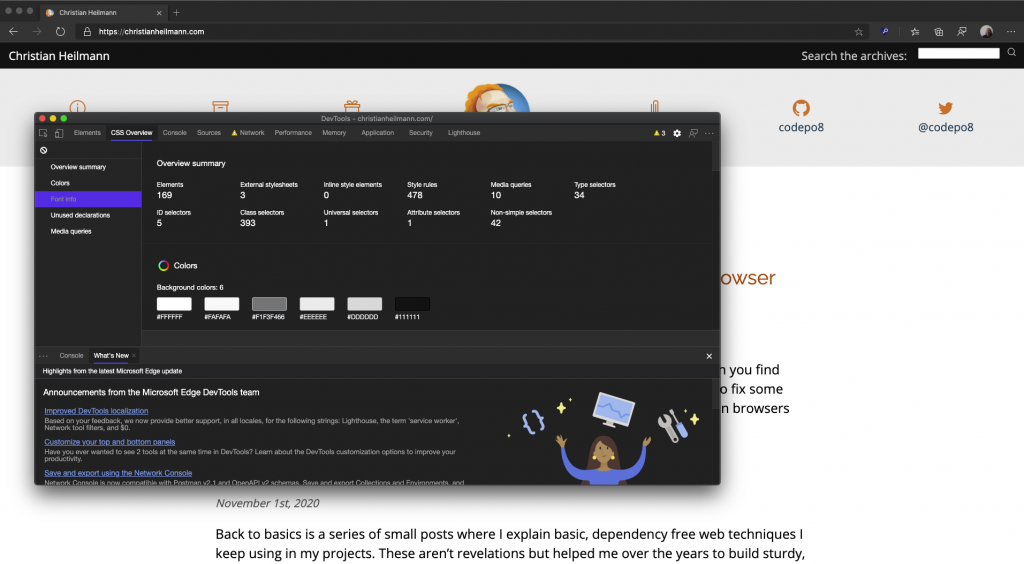
  6. Go to the … menu top right of the Developer Tools and select the “undock to separate window” option – the DevTools should be an own window now.
    Undocking the Developer Tools to get them in an own window
    Developer Tools in own Window
  7. Click on that window to give it focus and press CMD|Ctrl+Option+I again. This will open another DevTools instance that debugs the current one!
    Developer Tools debugging another instance of developer tools
  8. Go to the Elements tab and scroll all the way up until you are at the HTML element.
  9. Click the element and click the … menu at the beginning of the line
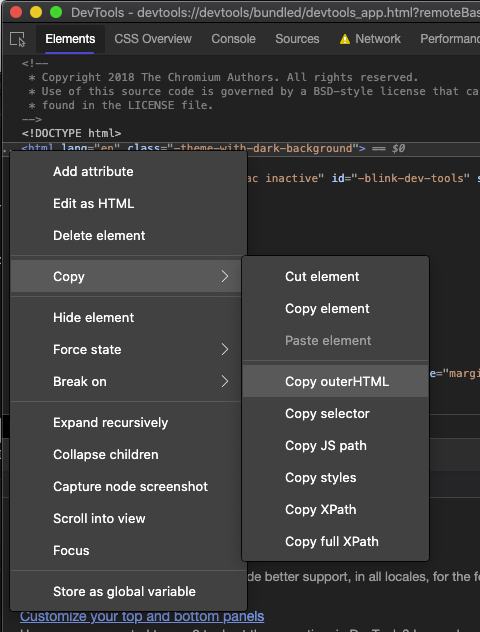
  10. Select “Copy Outer HTML” from the menu
    Selecting copy outer HTML in developer tools
  11. Close this instance of DevTools
  12. Dock the other instance back to the left of the browser (by selecting … again and choosing the left option)
  13. Open a new browser tab with CMD|Ctrl+t or hitting the + next to the tab
  14. Go to the Elements tab, and go back to the HTML element again.
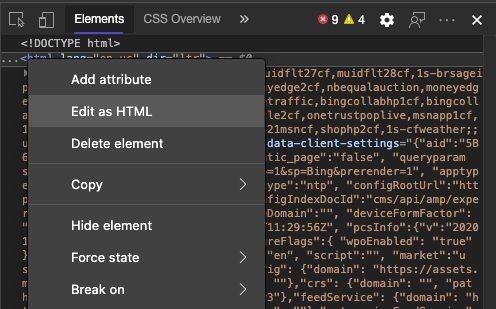
  15. Right-Click and select “Edit as HTML
    Edit as HTML
    Editing HTML in Devtools
  16. Highlight all the HTML with CMD|Ctrl+a and paste the copied HTML with CMD|Ctrl+v
  17. Click outside the edit box and the document is now the report of the CSS Overview
  18. Print, save as HTML or whatever else you fancy

Quick and dirty, but for now does the job. Tell me what you think about the CSS Overview feature and what else it should do on Twitter at either @ codepo8 or the official @ EdgeDevTools account.

How to persistently change third party web sites with browser developer tools

Tuesday, November 3rd, 2020

This has also been published on Medium and dev.to in case you prefer them.

Often you find things in web sites that annoy you. And – as a web developer – you’re even asked to fix some problems in web sites without getting access to the source.

Using developer tools in browsers you can change a lot of things and you can even fix some issues. You get visual tools to tweak colours, dimensions and more without having to know CSS.

The problem is that the changes aren’t persistent – once you reload the page, they are gone. Furthermore it is tough to make your changes accessible to others short of a screencast or pair programming using live share.

Stuart Langridge complained about that on his blog and longed back for the days of Greasemonkey and Userscripts. Both are still around and to a degree maintained. There are also a few extensions for other browsers than Firefox that do similar things. But the overhead of having to install an extension to do some tweaking seems a lot.

There are some features in browser developer tools that can help you with this task though. Some may be hard to find or you never looked, so here’s an overview.

Elements, Styles and Changes

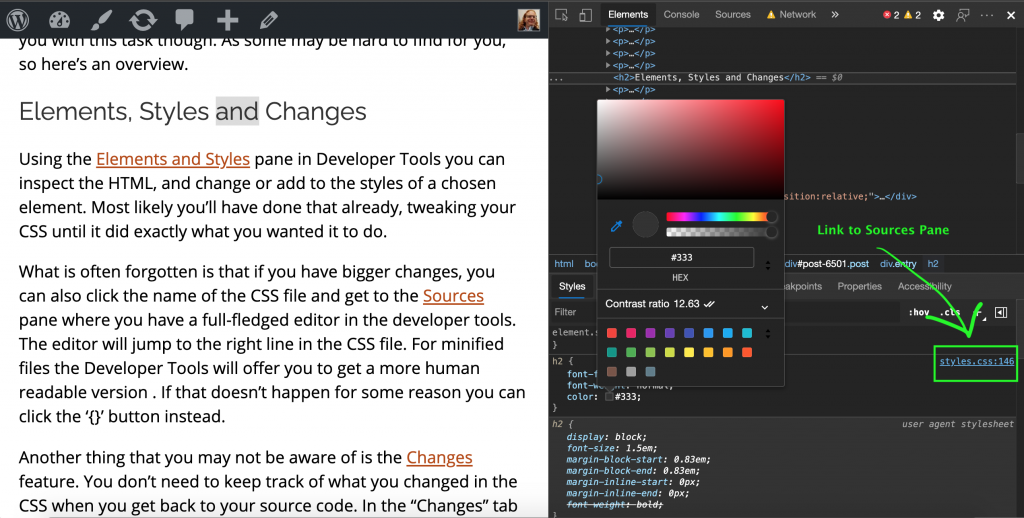
Using the Elements and Styles pane in Developer Tools you can inspect the HTML, and change or add to the styles of a chosen element. Most likely you’ll have done that already, tweaking your CSS until it did exactly what you wanted it to do.

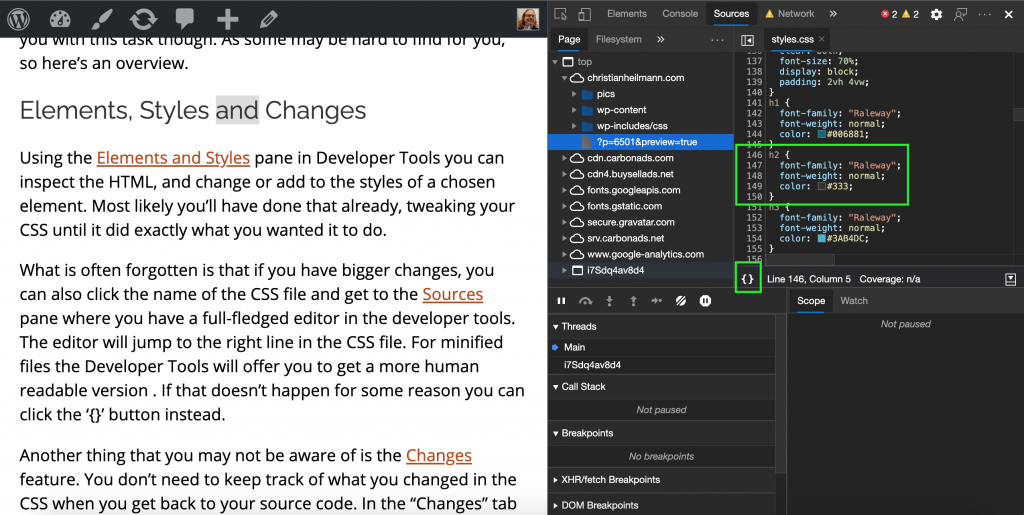
Link to opening the CSS in the Sources pane

What is often forgotten is that if you have bigger changes, you can also click the name of the CSS file and get to the Sources pane where you have a full-fledged editor in the developer tools. The editor will jump to the right line in the CSS file. For minified files the Developer Tools will offer you to get a more human readable version . If that doesn’t happen for some reason you can click the ‘{}’ button instead.

CSS file open in sources pane

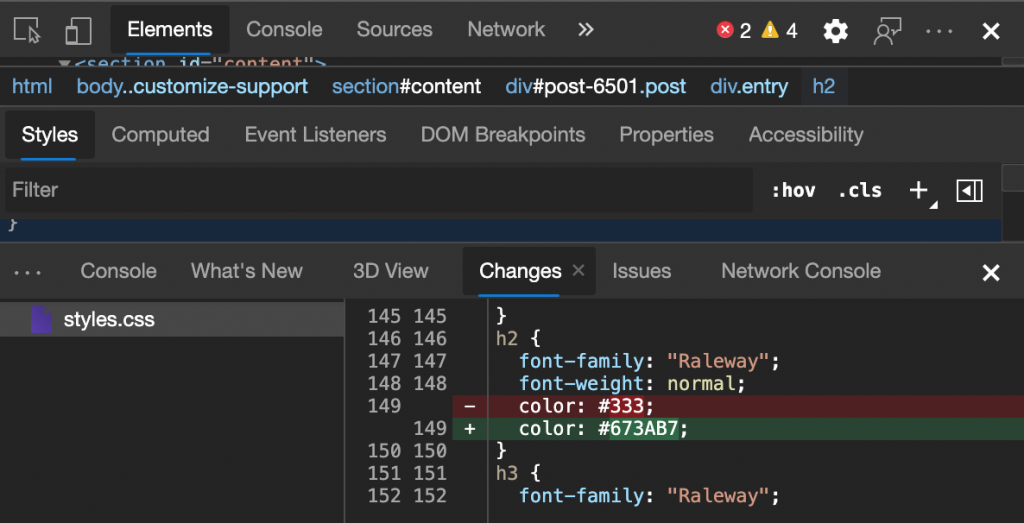
Another thing that you may not be aware of is the Changes feature. You don’t need to keep track of what you changed in the CSS when you get back to your source code. In the “Changes” tab you get a difference view of all the changes you did and you can copy and paste them.

The changes pane showing what happened to the CSS file when you used the developer tools

Console

The Console is the go-to JavaScript debugging environment for most (although Breakpoints are so much better). You can also write JavaScript in the console that gets executed in the Window object of the currently open document. You have some handy shortcuts available there. For example $ is document.querySelector, $$ is document.querySelectorAll and $0 is the currently selected element of Developer Tools. The copy() command copies to the clipboard. You can find a list of all the available commands in the docs.

Often you find yourself trying to cram all the code to run against the page into one line, but that’s not needed. If you hit enter on a line that isn’t a full JavaScript expression, Console automatically realises you want to write more and indents the next line. You can also always use Shift-Enter to force linebreaks and hit Enter to execute the code when you’re done. Hitting the up and down arrow allows you go back and forward in the Console history, much like any other Terminal emulator.

You can do clever things in the console. For example, if you wanted to get all the links in the document that have “media” in them and filter out duplicates, you could do the following:

copy(
   [...new Set($$('a')
      .map(l => l.href)
      .filter(l => l.includes('media')))]
  .join("\n")
)

Running this against this page for example will give you a list of 25 unique images.

Whilst this is powerful, you also will lose your work when you restart the browser and the Shift+Enter trick is useful but also feels not natural.

That’s why Developer Tools also have a way to edit and store snippets of code to execute in the context of the current page.

Snippets

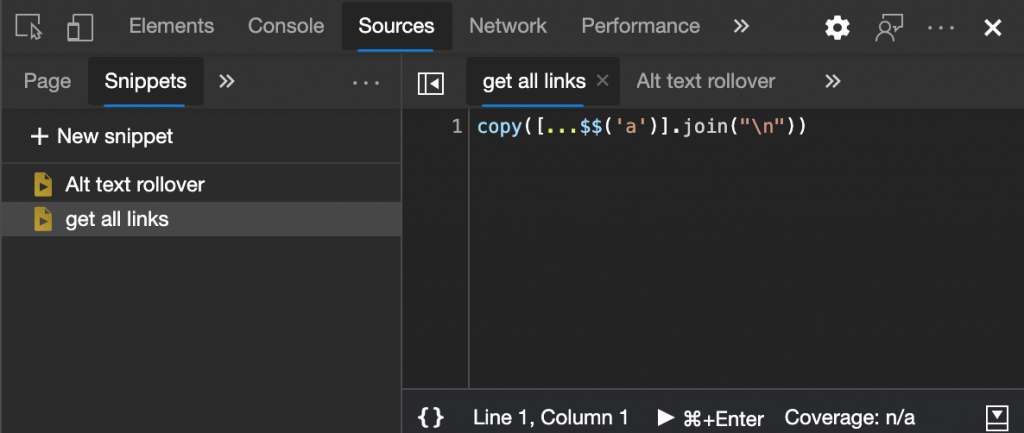
Snippets are a feature of the Sources pane in the Developer Tools. It allows you to write small scripts to execute in the context of the current page using a built-in editor. You can name the scripts and keep them as a collection for re-use later on.

Snippets in Developer Tools

This upgrades the Console experience, but you still need to run the script by hand every time you reload the page. And you can’t re-use any of the resources of the page you try to fix. To do this, you can use a feature called Overrides.

Overrides

By using Overrides you can take any resource of the current web site and store it locally on your computer. On later reloads of the document, the browser will take your local copy instead of the live one.

I wrote a detailed explanation how to use them on the official Developer Tools docs and here is a quick screencast explaining the feature.

The excellent part about overrides is that you use the real code of the page and change it. You can select files from the Network tab, directly from the Elements tab or really anywhere. Once you set up your overrides folder these stay in there as replacements until you delete them. The browser creates the correct folder structure for you. This means you can tweak the code and once you are done you can zip up your overrides folder and send it to the site maintainer as a drop-in. It is also an interesting feature to override annoying popup scripts.

More on overrides:

Summary

These are some of the features of Developer Tools that allow you to change web sites for you locally. It is fun to play with live sites and change them to your needs. And running a few scripts locally is most likely safer and less detrimental to the performance of your browser than using overzealous browser extensions.

Back to Basics: Event Delegation

Sunday, November 1st, 2020

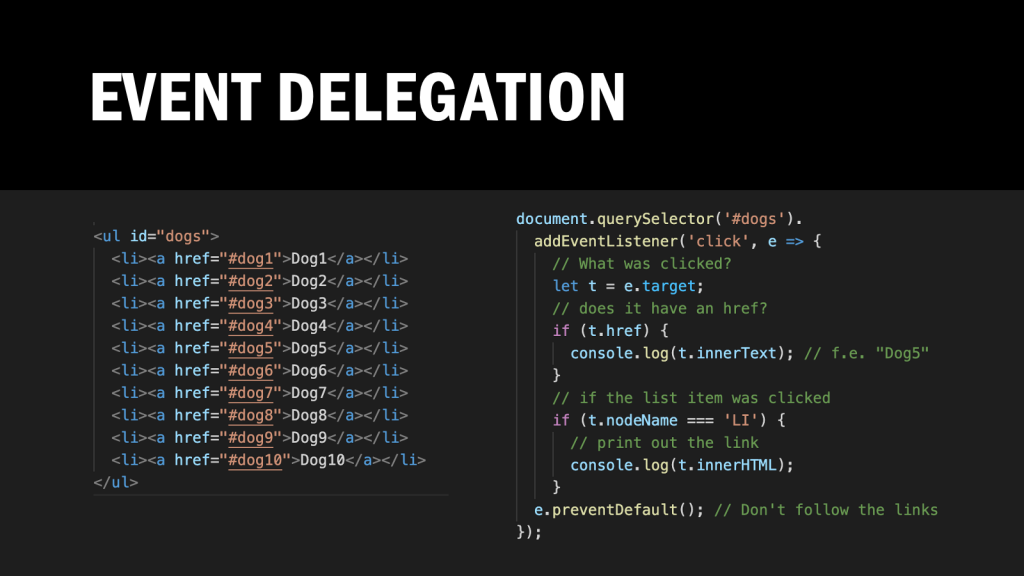
Screenshot of the event delegation example code

Back to basics is a series of small posts where I explain basic, dependency free web techniques I keep using in my projects. These aren’t revelations but helped me over the years to build sturdy, easy to maintain projects.

One of my favourite tricks when it comes to building web interfaces is Event Delegation

Events don’t just happen on the element you apply them to. Instead they go all the way down the DOM tree to the event and back up again. These phases of the event lifecycle are called event bubbling and event capture.

The practical upshot of this is that you don’t need to apply event handlers to every element in the document. Instead, often one handler on a parent element is enough. In the long ago, this was incredibly important as older browsers often had memory leaks connected with event handling.

Say you have a list of links, and instead of following these links you want to do something in code when the user clicks on them:

<ul id="dogs">
  <li><a href="#dog1">Dog1</a></li>
  <li><a href="#dog2">Dog2</a></li>
  <li><a href="#dog3">Dog3</a></li>
  <li><a href="#dog4">Dog4</a></li>
  <li><a href="#dog5">Dog5</a></li>
  <li><a href="#dog6">Dog6</a></li>
  <li><a href="#dog7">Dog7</a></li>
  <li><a href="#dog8">Dog8</a></li>
  <li><a href="#dog9">Dog9</a></li>
  <li><a href="#dog10">Dog10</a></li>
</ul>

You could loop over each of the links and assign a click handler to each:

const linkclicked = (e,l) => {
  console.log(l);
  output.innerHTML = l.innerHTML; 
  e.preventDefault();
};
const assignhandlers = elm => {
  let links = document.querySelectorAll(`${elm} a`);
  links.forEach(l => {
    l.addEventListener('click', e => {linkclicked(e,l)});
  });
}
assignhandlers('#dogs');

You can try this event handling example here and the code is available on GitHub (event.handling.html).

This works, but there are two problems:

1. When the content of the list changes, you need to re-index the list (as in, call assignhandlers() once more)
2. You only react to the links being clicked, if you also want to do something when the list items are clicked you need to assign even more handlers.

You can try this by clicking the “Toggle more dogs” button in the example. It adds more items to the list and when you click them, nothing happens.

With event delegation, this is much easier:

document.querySelector('#dogs').
  addEventListener('click', e => {
    // What was clicked?
    let t = e.target; 
    // does it have an href?
    if (t.href) { 
      console.log(t.innerText); // f.e. "Dog5"  
      output.innerHTML = t.innerText; 
    }
    // if the list item was clicked
    if (t.nodeName === 'LI') { 
      // print out the link
      console.log(t.innerHTML);
      output.innerHTML = t.innerHTML; 
    }
  e.preventDefault(); // Don't follow the links
});

You can try this event delegation example here and the code is available on GitHub (event-delegation.html). If you now click the “Toggle more dogs” button, and click any of the links with puppies, you’ll see what it still works.

There are a few things you can do to determine what element the click event happened on. The most important bit here is the “let t = e.target;” line, which stores the element that is currently reported by the event capturing/bubbling cycle. If I want to react to a link, I check if a “href” exists on the target. If I want to react to a list item, I compare the ‘nodeName’ to ‘LI’. Notice that node names are always uppercase if you do that kind of checking.

I really like event delegation as it gives me a lot more flexibility and I don’t have to worry about changes in content. The handler just lies in wait until it is needed.